Writing for Developers and Consultants: Editing

The most important thing you need to have to be a successful consultant is excellent communications skills . If your client doesn’t understand and trust what you tell them, it doesn’t matter what you suggest, create, build, or deliver.

I have been helping a few colleagues lately work on their client communication skills and figured I should write down my suggestions for how developers can communicate well with clients.

Everyone on a project team needs to be able to communicate what they need, what they are doing, and how their piece of the project works. They also need to know how to address their own errors and mistakes so the project moves forward and the client trusts that errors will be resolved.

As I sat down to write this piece I realized the topic is huge; far too large for one post. I’ve thought about the importance of good writing, editing, grammar, the kinds of email messages we send, documents we write, and presentations we give. 

All of those probably justify at least one post, so I’m starting here: editing.

Why Editing is Important

Editing probably feels like an odd place to start a series on writing, but it is a thing you can start to do now that will help you write more effectively. If you have a college degree you probably got into the habit of writing papers fast, and turning them in at the deadline. But you almost certainly didn’t do enough editing of those papers (I’m married to a college professor, and I talk to college professors a lot: No. You. Didn’t.). If you don’t have a college degree, it’s also unlikely many people have sat down and talked to you about the importance of editing. If you’ve come to consulting from a writing-heavy background you’ve figured out by now the value of editing – this post isn’t really for you, so please come back for later installments.

Editing is how you take poor, or merely acceptable writing, and make it clear and compelling. 

Good editing is about more than basic mechanics, it’s about testing that your idea or explanation makes sense. Editing lets you clean up awkward, but technically correct, expressions. And it gives you a chance to reflect on how your audience will read the material. As you edit, see if each sentence makes sense to them the same way it does to you.

Editors Are A Luxury

A good editor is worth their weight in gold – sometimes more. Well known authors have been known to change publishing houses to follow a good editor. They are also not part of your typical consulting team. For consultants, having an editor is a rare luxury. 

For large documents, good teams will make sure one or two people give completed drafts an editing pass. Often getting support from a marketing department to edit a conference talk is possible. Another person reading an email and offering edits happens exceptionally rarely. It’s the same with internal presentations. No one will edit your chat messages except you.

So, while an outside editor is an invaluable tool, a consultant should not expect to have access to one.

Be Your Own Editor

That means you have to be your own editor. Editing your own writing is hard. If you could see the mistake the first time, you would have fixed it before you write the next sentence (those kinds of fixes are not the same as editing, that’s “fixing typos” or “not being lazy”).

There are three main tricks I use when being my own editor:

  • Put the document aside between writing and editing – the longer the better
  • Reading it aloud to yourself (yes really, out loud)
  • Edit on paper (use one of those printer things)

I wrote the first draft of this while sitting in the Atlanta airport. I revisited and edited a printed draft a few days later (my wife also took a pass – see above). And again after I put it into my blog. It’ll probably get a few tweaks after it’s posted.

Don’t Let Edits Be Personal

Writing, even technical writing, is very personal; editing should not be. 

A good edit may be brutal to the original material. If you get too attached to your first draft, you will be tempted to skip asking for an edit or doing an editing pass yourself. That’s part of why I put a document aside for a bit between writing and editing, it gives me space to see the flaws in my words and ideas.

Several years ago I was editing a long report for AFSC, and the first draft was far too long, too detailed, had too many tangents, and didn’t focus on the intended audience. I attacked it. She and I spoke several times to make sure she understood my goal was to help make her was succeed. Through aggressive editing we made sure her great work achieved her intended goal: stopping the unchecked growth of private prisons.

I deleted entire sections, rewrote the summary (which someone else then edited for me). I pulled in favors, got my wife to edit drafts. We debated chapter order, technical details, and sentence after sentence. What started at 100 pages, ended up being 20 page report with an 8 page summary that journalists and politicians cited as they debated proposed private prison expansion. Because of that work, and follow on efforts by people using it as a model, private prison growth has slowed substantially (if that’s not a topic you know about, trust me that’s a good thing). The author and I became friends and worked together well on follow up projects and efforts. She appreciated the value of the edits even if they were painful at first.

Edit Aggressively

Whether your editing for yourself, or for someone else, dig deep and edit aggressively. If you haven’t done much editing you want to think about every word, every piece of punctuation, every detail. As you get more practice you’ll find short cuts and learn your own weaknesses (or your team’s).  I use too many words, and write long sentences – I attack those. Shorter is better.

Using traditional grammar tools can be helpful, particularly if you are unsure about the basic grammar rules. But if you use tools like Grammarly or ChatGPT to rewrite things make sure you think carefully about if, and why, you like that version better. Used well Generative AIs are a useful tool, but if you lean on those tools too much you don’t actually get better yourself.

More to Come

As I said at the top, communications skills for developers and consultants is an enormous topic. I have not yet planned the series, but you should expect more to come (and I’ll edit this section to add references).

Salesforce Github Actions

I started this post back in November, but got rather distracted last month.

I have been wanting to setup a CI pipeline for Salesforce scratch orgs for a long time. The documentation out there isn’t great, and it’s taken me awhile to get around to powering through the details. For testing that my scratch org configurations for Education Cloud and Nonprofit Cloud to work properly I finally bit the bullet and setup a Github action.

What you’ll need

  1. An SFDX-style project on Github that you want to setup for automated testing that includes a Salesforce scratch org.
  2. An org with Devhub enabled. I recommend using a production org for this, not a developer org because of the higher scratch org limits. There are no good reasons not to enable Devhub.
  3. A working install of sf cli with a connection to that devhub-enabled org.

Setup Github Secret

For your action to work it will need to use your connection to your Salesforce Devhub. Salesforce CLI stores the needed key on your local machine, which includes tokens to open the org. You will need to put those keys into a Github secret for proper security.

Note: Should that key ever be compromised, they attacker will be able to open the org as the same user. I suggest you consider using a dedicated user with either a Free Limited Access License, or another similarly restrictive set of permissions. These users are designed to avoid exposing data if they are compromised (they are also free, which has some upsides). That said, you can get yourself started with any user that can access to Devhub objects and then switch out to something more restricted later.

To get the key from sf cli, run sf org display -o [your devhub alias] --verbose where [your devhub alias] is the name of the connection you selected when setting up the connection. The output of that command will include: “Sfdx Auth Url”, that is the value you need in your Github secret.

  1. In Github, go to your repository’s settings, expand Secrets and Variables from the left menu, and select Actions.
  2. Create a new Repository secret.
  3. Name the secret DEVHUB_SFDX_URL
  4. Copy and Paste the Sfdx Auth Url value into the Secret field.

Create the Github Action

The full details of Github Actions are a deep topic, as are the full capabilities of sf cli for testing. So I’m going to focus on setup of an action the creates your scratch org. From there you can expand your workflow as you need.

In your project root create a .github folder, and workflows folder within if you don’t already have them. In the workflows folder create a file called buildScratch.yml.

Copy the following code (explained below) into your file:

name: test run scratch

# Definition when the workflow should run
on:
  # The workflow will run whenever an event happens on a pull request
  pull_request:
    types: [opened, synchronize]

jobs:
  validate_scratch_deploy:
    runs-on: ubuntu-latest
    steps:
      # Install Salesforce CLI
      - name: "Install Salesforce CLI"
        run: |
          npm install @salesforce/cli --location=global
          nodeInstallPath=$(npm config get prefix)
          echo "$nodeInstallPath/bin" >> $GITHUB_PATH
          sf --version
      # Checkout the code in the pull request
      - name: "Checkout source code"
        uses: actions/checkout@v3
      # Load secret for dev hub
      - name: "Populate auth file with SFDX_URL secret"
        shell: bash
        run: "echo ${{ secrets.DEVHUB_SFDX_URL}} > ./SFDX_URL_STORE.txt"
      - name: "Authenticate with dev hub"
        run: sf org login sfdx-url -f ./SFDX_URL_STORE.txt -a devhub -d
      # Create a scratch org
      - name: "Create scratch org"
        run: "sf org create scratch -d -f config/project-scratch.json -a our-scratch-org --duration-days 1"
      # Deploy Project Manifest
      - name: "Deploy Metadata"
        run: "sf project deploy start --manifest manifest.xml --target-org our-scratch-org"

Action Breakdown

The first few lines are common to all actions, it gets a name, then a set of conditions to trigger the workflow. In this case we’re calling our workflow “test run scratch” and it will run when a Pull Request is opened or gets new commits.

The jobs section is the more interesting bit. We tell Github to create a virtual machine using the most recent version of Ubuntu Linux. Next we install Salesforce CLI onto that virtual machine. Once that’s done, we tell it to checkout our code from Github onto this virtual machine. With all our tools in place we’re ready to start the real work.

The next two steps extract the Github secret we defined earlier into a file on the virtual machine and use that file to authenticate to your Salesforce devhub. All that work gets this temporary virtual machine into the same position as your personal device probably was when we started.

The last two steps create the scratch org based on a hypothetical scratch org configuration file and gives the scratch org a short life of one day. Finally deploy your project’s manifest-tracked metadata. This last step could use any version of the deploy command. It could also be added by more steps to deploy other metadata, run tests, or anything else you want to have happen.

Closing Thoughts

Building from this point you can do all kinds of things. For example, if you don’t need to gain access to the org itself, you can include a step to delete the scratch org when you’re done to help avoid the active scratch limit.

You’ll want to pay attention to the limits of your org to see if you need to tweak the triggers of your workflow. If you aren’t using a production org you scratch limit is only 6 per day, and three at a time; I blew through that testing the steps in this article. Even larger orgs only have 200 per day. So be thoughtful about when your action runs, and how often you clean up.

As always, if you find a flaw in my solution please let me know. I’m always interested in making these better.

Goodbye Mom

Earlier this month my mother, Maria Crosman, passed away. Her life came to a peaceful end after a long slow decline. My sister, father, and I were at her side at the end.

It’s hard to know what to include when writing a remembrance of Mom. No one post can really cover it all. So I’m not really trying. In addition to being my mother, mom was a minister, teacher, mentor, pastor, gardener, grandmother, and friend. She could be serious, stern, loving, warm, and funny. When the situation called for it, she could switch between those mode quickly.

At 15 she felt called to ministry, and was immediately told by her pastor that ministry wasn’t for women. Since Quakers had encouraged women to be ministers since our founding, Mom promptly began attending Abington Meeting. She went on to earn Masters and then a Doctorate in Ministry and a recorded Friends minister. Along with my father she served as pastor to two churches. Before finally becoming a teacher and sharing her gifts with her students and colleagues. Over the course of her life she found a multitude of ways to let her life speak.

Trying to tell my mother she wasn’t welcome never got a meek response.

For roughly 40 years her life intersected with those of George School‘s students and the larger community there. Her goal was always to find ways to help the students grow into the best versions of themselves.

My first two years as a student there I ended up with a locker about 8 feet from her office door. She was running the student co-op program at the time. Every student at George School performs basic tasks like cleaning classrooms and serving meals, and her job was to issue those assignments. Mom believed deeply in the program, and in making sure privileged students did their share. I know first hand that not all my peers appreciated the value of that form of learning. But we have heard from former students in recent weeks, and found thank you letters from students, colleagues, and even peers at other schools among her papers, all testifying to the mark she left on those around her.

Some of those students who grumbled about early co-op assignments, appreciated her support when they found themselves needing extra love in a hard moment. I recall vividly an evening a friend of mine recognized another friend in crisis, a quick call and mom returned to campus to set in motion interventions that saved the life a student. She could draw lines and set boundaries that teenagers need in one moment, and open her arms for hugs we needed even more in the next.

As we have heard from friends and former colleagues many people have shared memories about her craft projects, and how she taught them to knit, quilt, bake, garden, and other crafts. For Mom those were all forms of connection.

She baked, mostly with flour that she could not eat, so others would have a treat to enjoy. Our family households are filled with wedding quilts. Knitting projects done during faculty meetings were often presents for others – and the chance to sit and knit with another person was a chance to form or deepen a friendship.

Even after she stopped formally leading congregations mom still found ways to do the work of a pastor as well. She loved performing weddings for friends, family, or even strangers. At Silver Bay she served as summer chaplain, and spent time as interim chaplain at Adirondack Friends Meeting. Never one to stay on the sidelines, she stepped into all kinds of situations from memorial services to medical crises because she saw a need she could fill.

My wife once saw my mother jump into another family’s medical crisis. The doctor was doing a poor job of explaining a scary situation to young parents in an ER. So poorly the father was nearing the point of striking the doctor. Mom inserted herself and managed to calm the father. She validated his fears and reminded him of the importance of stay calm for his child’s sake. She also took the doctor to task for not being clear and supportive and pushed him to help the parents understand. We have no way to know what happened to the child, but in that moment my mother was able to help everyone find next steps.

Having grown up in an often divided family, she sought to find and build connections within the family she built and between us and our community.

Everywhere she went, my mother tried to make friends. Often those friends would find themselves called on the help in crisis. When a student needed more counseling than the school could provide – she called a therapist friend. When a student needed advanced dental work and lacked the means to pay, she called another friend. She’d come home from nearly any place with stories of people she’d met and the interesting things they had taught her.

I miss her. I expect I always will. But I’m happy for the time we had together, and the lessons she was able to teach me. Especially the importance of connections with others.

Salesforce Nonprofit and Education Scratch Orgs

During the recent Open Source Commons sprint in Chicago, I tried to create scratch orgs for nonprofit and education clouds. Despite having some of the best people in the market in the room, including two Salesforce Solution Engineers, two levels of their bosses, and of course Google, I couldn’t figure it out.

As a follow up to a conversation there, Larry Fontillas sent me links to the help docs that contain what I consider partial answers. While I’ve sent feedback to help improve those articles, I am posting my current solution to this challenge.

My Example Scratch Config

On Github I created a repo that contains two scratch org configuration files:

Each is my attempt to create a definition that works for the named cloud. If are new to scratch orgs, I suggest you start with the Trailhead Salesforce DX Quick Start. With a Devhub setup, and connected to your sf cli, you can easily create these scratch orgs from my settings with one of the two following commands:

sf org create scratch -d -f config/nonprofit-cloud.json -a npc-org
sf org create scratch -d -f config/education-cloud.json -a edu-org

Industry Org Scratch Config Breakdown

The two new clouds leve re-usable components Salesforce built, licenses, and deploys across different markets. Salesforce does not currently provide one master switch you must use. Instead you need to know what features to include and tell the Devhub which collection to enable.

That is done in two major parts of the configuration file. In my Nonprofit cloud config file there are several sections, but two are critical: features and settings → IndustriesSettings. The features list includes Salesforce components to enable. In this case I included the nonprofit specific Fundraising, Program Management, and Grantmaking modules, but also OminiStudio, Accounting Subledger, and more because they included with NP Cloud by default. Under Industries Settings you’ll also see I enable Grantmaking and support for Program Management.

The Education Cloud config file has even more detail. That’s because Salesforce as made more available for Education Cloud. The Industries settings section includes more flags as well for the same reason. As I Followed the setup guide for Education Cloud, I further adjusted some of the base-line object permissions.

Here are the features I know you need to include for each cloud:

FeatureNP CloudEdu CloudNotes
AccountingSubledgerGrowthEditionOptionalOptionalStarter Edition is also available
AccountSubledgerUserOptionalOptional
AnalyticsQueryServiceYesOptionalThis is listed in the docs under Fundraising, but I have not yet found a direct description.
AssessmentsYesYes
EducationCloudNoYes (requires a quantity parameter)Main Education Cloud objects, but only a sliver of the features.
EnableSetPasswordInApiYesYesAllows the cli to set the password, you always want this.
FundraisingYesOptional
GrantmakingYesOptional (Rare)
IndustriesActionPlanNoYes
IndustriesSalesExcellenceAddOnYesYesThis is listed in the docs under Fundraising, but I have not yet found a direct description.
IndustriesServiceExcellenceAddOnYesYesThis is listed in the docs under Fundraising, but I have not yet found a direct description.
LightningSchedulerNoYesLightning Scheduler gives you tools to simplify appointment scheduling in Salesforce.
LightningServiceConsoleOptionalYesAllows the Lightning Service Console and access features that help manage cases faster.
MarketingUserYesOptionalProvides access to the Campaigns object.
OmniStudioDesignerYesYesListed in lots of samples, but I have not yet found a direct description. But clearly needed for OmniStudio.
OmniStudioRuntimeYesYesMore for OmniStudio.
OutcomeManagementYesNo
PersonAccountsYesYesWe all love Person Accounts now! Technically this is optional, although the assumption is it your default.
ProgramManagementYesNoEnables the NPC Program and Case management features.
PublicSectorAccessNoYesNot entirely sure about this one, but some of the features for Education Cloud seem to leverage these objects and settings.

Feedback Please!

I have tested these configurations to the degree of seeing that they work as a basic level. But I have not, yet, used them for a serious project. I am confident other people will find details that are missing, or just wrong. Please file an issue on Github or leave me a comment here with suggested changes.

A Salesforce Data Migration Pattern

Loading large amounts of data into Salesforce is a non-trivial exercise. While traditional databases can often be loaded in nearly any order, or with just a few simple considerations for foreign keys, Salesforce’s platform behaviors require several special considerations.

Over the last few years I’ve done a number of large data migrations into Salesforce, and developed a pattern I like to follow. This pattern allows me to load data efficiently at any scale.While the implementation details will vary, you can adapt this pattern to your projects. 

Efficiency matters more the larger your project: for a small project, this is overkill. If you are loading 1,000 Contacts it will probably take you longer to setup my process than just format the file in Excel and load it through Data Loader. But if you need to load 100’s of thousands of records, millions of records, across lots of different objects, this pattern can save hours or even days.

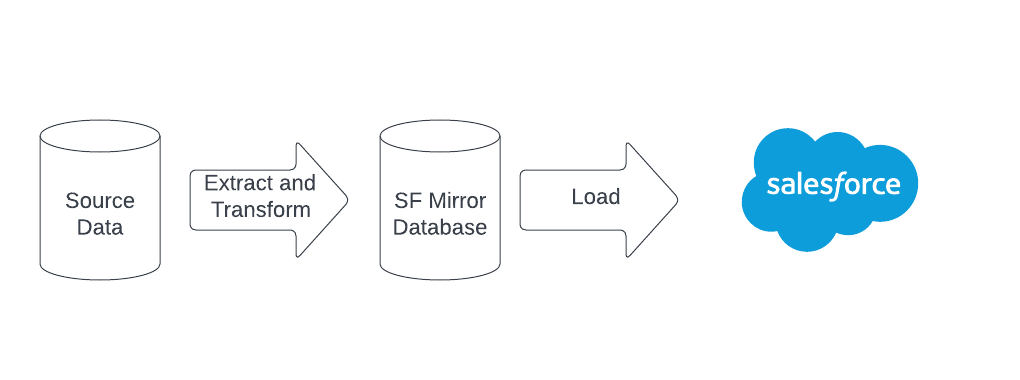
Migration Process Overview

The general concept here, is that you’ll run your migration in two major phases:

  1. Prepare the data in a staging database.
  2. Load the data into Salesforce.
Diagram of a two stage migration, first from the source data into a Salesforce staging database, and then from the staging database into Salesforce.

Salesforce Schema Mirror Staging Database

The key to this process is that staging database in the middle. 

In my experience having a database that is a clone of Salesforce’s schema allows you to fully prepare the data prior to loading. It also gives you a source of truth when handling partially loaded data.

Salesforce is slow to load compared to most traditional databases. By having a staging database you can load fast, gives you a chance to insert steps into your process that are hard in other contexts. These steps allow for testing, speed-enhancements, and error recovery.

Some ETL tools make a staging database easy to build, others do not. If you aren’t sure how to build such a database (or it seems like a huge effort to re-create all those tables), you can use Salesforce2Sql – that’s why I created it. It will clone your Salesforce org’s schema into any of its supported databases.

Testing and Error Recovery

The staging database lets you test for errors after you do your initial conversion; before you load it into Salesforce. You can leverage reporting and scripting engines designed for that database. You can log and error trap during your loading process far more gracefully than the Salesforce APIs support by default.

I often add one more table than just the objects: a logging table. This allows me a place to write the rows from Salesforce error files, and also log the time it takes for each process to run. I can see exactly what errors my process encounters at the record level during testing, and measure the running time.

This database will also give you a place to trace what has, and has not, been loaded into Salesforce. More about how to implement this and drive performance to come.

Transform the Data

Using the tool of your choice, create a process to transform the data from the source data into your staging database. How you do this stage could be a series of posts by itself. For my ideas on a good process for this I suggest my Queries on Queries talk.

Your process will have a mountain of small details – I often describe it as “hard and boring”. Done well this is your best point in the process for testing your work. Test thoroughly! You should run this process so many times you lose count.

Salesforce Migration Keys 

One important detail is that you will want to leave the main record Id field null. Your legacy Id goes into a legacy Id field, but the main Id field should be empty. We’ll use that in the loading stage to determine which records were successfully loaded and which need follow up attention.

Every object you are migrating should have a legacy Id field that links back to your source database. These should generally be text fields, set to be external Ids and unique. These fields will both help with the migration itself, but also the validation process – and should you need to, you will be able to update the data post-migration using those same keys.

To handle references between records use the legacy Ids as the lookup Id values. For example, on a Salesforce Contact there is an AccountId field to reference the parent account. The Account’s legacy Id should be in AccountId. Often this value is already in your foreign key fields so it can be a real time saver in your transformation build. We’ll see in a minute how we use those to resolve to new Salesforce Ids as we load data.

Data Cleaning

This is also the time and place to do whatever data cleansing you plan to do in your process. You can do that work post-launch as well (mostly). I highly recommend this cleansing be automated for large data sets. If you can’t automate it, do it pre-migration in your old system, or post-migration in Salesforce.

Pre-Load Data Validation

Using the staging database your transformed data can be fully validated before you load it.

  • Check your references: Make sure all your lookup fields are populated with valid data. 
  • Check your record counts: Do you have the expected number of records in every table? 
  • Check your critical fields: All data points are created equal, but some are more equal than others. Check those a few extra times.

If you have the time and resources, you can write scripts and other automations to run these tests for you. The more the better.

Loading Salesforce

Finally, all that data you just transform and staged is ready for high volume loading. For each object you run two steps:

  1. Insert the data via the Bulk API (Insert not Upsert!), record the start and end time and all errors in your log table.
  2. Update the records in your staging database to add the new Salesforce Id into the source record’s Id column (the one I told you to leave blank before).

When there are no null values left in the Id column, you have loaded all your data. If there are records that refuse to load, for any reason, you will know because the Id will be null. If you logged the errors you can see why.

You will also use those Ids in later jobs to update the reference Ids. Remember, we put the legacy Id into your reference fields, when you actually load the data you need to replace that legacy Id with the actual Salesforce Id.

When possible you should build these load jobs to only load records without a Salesforce Id already assigned. That will allow you to safely re-run the job if it encounters errors that lead to partial success (like record locking, see below).

Why Not Upsert?

People used to loading small amounts of data will be tempted to use Salesforce’s upsert command. The benefit is that it allows you to use those legacy Id values directly instead of swapping for the newly generated Id. But as record volumes grow, upsert performance drops – I’ve had projects where I measured it at ⅓ the speed of insert, I heard of projects where it got far worse than that. The larger the dataset, the more important it is to use Insert.

Playing Nice with Salesforce

To make sure your data loads correctly, and efficiently, there are three more important details you still need to plan for: 

  1. Automations and Sharing Rules
  2. Object Load Order
  3. Record Load Order

Automations and Sharing Rules

Automations take time to run, even small amounts of time add-up when loading large amounts of data. To the degree possible, you want automations off. Some automations you want to replicate in your transformation process – particularly if it’s a simple field value or record creation. Some automations you want to defer and run later, like custom roll up values via DLRS, NPSP rollups, or similar approaches. And some automations you cannot disable at all.

Sharing calculations in Salesforce are really a special-purpose automation. Just not one you often think about unless you’re doing manual sharing. Like all automations in Salesforce, the more data you load, the larger the impact of these calculations. Salesforce allows you to defer these calculations and run them in the future. The more complex your security setup, the more impact this will have (open security models can generally ignore this consideration).

The person doing the data loading needs to work with the folks that implemented those automations to map out which can be disabled, which can be deferred, and which must to be tolerated.

Object Load Order

In Salesforce, object load order is critical. You cannot disable or defer assignment of required references. So you need to understand the object hierarchy and relationships.

Generally you start with objects that have no dependencies: e.g. Account, Campaign, Product, Lead.

Then proceed to objects that have relationships to those: e.g. Contact

Then to objects that can have relationships to objects from that previous layer: e.g. Opportunity, Account Contact Relation, Campaign Member

When possible, test running two objects in parallel. What exact combination is most efficient will vary by org details and data volumes. My experience is that you will be able to run objects in 4-5 groups usually with two or three objects loading in parallel.

Ideally we’d just load records and not have to go back and update, but if there are circular references, or record hierarchies you’ll need to update records after insert. Plan that second pass into your sequence.

Users

Salesforce Users are a special case. If you have a security model where record ownership is important, you need to load Users first.  If you have an open security model, I recommend loading Users last – and the smallest number of Users possible.  Remember, Salesforce bans User deletion, so you must be as careful as possible about loading them.  I never like to load Experience Cloud Users if I can avoid it – 1,000’s of accounts that will never be used but cannot be deleted is sub-optimal.

Record Load Order and Record Locks

Salesforce has aggressive record locking to deal with concurrent edits and updates across relationships. Great for day-to-day operation; frustrating when you’re loading data.

The first place people often encounter this is when they go to load Opportunities. Opportunity bulk load can run into massive problems with Account records being locked because another Opportunity is being loading for the same Account in a parallel process. If you sort the records by the locking parent record you can often reduce, if not eliminate, your record locking issues.

Use Serial Mode only as a last resort. Serial mode is ⅕ the speed of Parallel mode most of the time. There are situations that call for it. But it should never be your default go-to solution. Try everything else first before resorting to serial mode. Since you have tracking of which records were loaded or failed, if you design your load job carefully you can just re-run to resolve small numbers of record locks.

Extra Sorting Trick:

It turns out, in many cases the way data gets entered over time will gather it in useful patterns. So sorting data by a date field can radically reduce record lock contention. If you cannot figure out what field to sort by (often because sorting by field 1 causes locking issues on another object) try sorting by a date field and see if that helps.

Warning: depending on your data patterns, it can make the problem vastly worse too.

Mock Runs

A mock run is a test load into a sandbox that should involve you going through all the steps to load the data – starting with extracting it from the source system.

I personally recommend at least two full test mocks of your process.

If you’re working on a tight budget that may not be feasible (migrations are the first place project leaders trim budgets, and the first place users complain about errors), but that doesn’t mean multiple tests aren’t valuable.

The first test will go poorly, but you’ll learn a lot. The second test will, hopefully, go far better, but you will still learn a great deal. 

In your testing you should expect to find places where your mappings are wrong, your transformations are incorrect, your testing is inadequate, your load order doesn’t work, you have source data patterns not accounted for, and more. Make time for good testing, you’ll thank yourself later.

Final Considerations

Large volume data loading in Salesforce is a deep topic. For all this is a long article, I’ve left out a lot of details. I designed this pattern to support high speed loads, rigorous testing, and error recovery. But within each of step of this pattern I could write articles this long or longer. You should continue to research the topic and adapt your implementation to your project.

A few sample topics you might consider:

You may even need to do something I’ve never encountered before.

But in any large volume Salesforce data load, the general pattern outlined here will serve you well.

Thoughts on My First Dreamforce

I’ve been full time in the Salesforce eco-system for a little over five years. I have eight certifications, co-lead a community open source project, have been on the planning committee for Nonprofit Dreaming twice, and am an MVP. But until this year, I’d never been in Dreamforce.

If you’d like a breakdown of the content from Dreamforce, there are many better sources for that. Salesforce+, the plethora of blog posts written more quickly by people who went to more sessions. This is just my reflections on my experience.

Overhead picture of people milling around outside at Dreamforce
It felt a lot more crowded than that, particularly for my first work event post pandemic.

For my first post-pandemic work trip it was a more than a little overwhelming. Dreamforce was supposed to have roughly 40,000 people. The largest professional in-person event I’ve been part of in 4 years was my wife’s department gathering at our house – I think 10-15 people came. This was a little bigger.

Networking is Still Most Important

For me the most important part of any professional conference is the networking. And you put 40,000 people together, there are going to be interesting people to meet.

Friends from the Knitforce group at the Amplify breakfast.
Some of the folks from my Sunday afternoon knitting group at the Amplify breakfast. I have known these people for a couple years, but never met them in person. Thanks Jana Walker for the picture.

I was able to spend time with old friends. Meet people in person I had previously met only online. And I got a chance to spend time with new colleagues.

Figuring out how to engage with that many people is a challenge for nearly anyone. Having not been to any conferences for awhile, it took me a little time to get my rhythm back.

Still, talking with other people who are active in the space is the best way to gain insights. Sure, I attending some workshops, and I did learn a few things in those. But sitting around playing cards with friends, or hearing people complain about bugs over drinks, is often far more informative. Not because those speakers aren’t good, but because they are speaking to a group in a polished way – of the cuff in a small group people share more details and reveal the hard earned lessons.

Sales and Client Meetings Are Fun

Working now for Coastal Cloud, which has people qualified to work on all the Salesforce products in all the industry verticals, meant I spent more time working our booth and visiting with clients than I would have in some of my more recent jobs.

The Coastal Cloud Booth.

On the one hand, standing around a sales booth, talking to people who really just want to see what swag you have on the table, isn’t a thrill a minute. But I learned early in my career that those conversations are just as much 1:1 networking as any other. And I like people, so talking to people is fun.

Not every organization would benefit from a booth at Dreamforce. But Coastal Cloud did (at least I think we did, other people are running those numbers), and it was fun to be part of that.

Dreamforce also attracted currently clients and potential clients we are already in the proposal stage with. I really like chances to talk to those people. Sometimes we talked about their projects, but more of the time was spent getting to know the larger context of their work. That means hearing about the work we’re empowering through our efforts. It also gives us all a chance to share personal information we might have otherwise missed.

Stuff I Could Have Done Better

My MVP Award. Blue at the top with my name printed on it. An a cork-board in the middle for annual pins from Salesforce. I just have the one for this year.
Being late meant I missed the formal presentation to MVPs of awards, but I still got mine.

In part because I changed job during critical window to arrange flights and hotels rooms, and in part due to lack of experience, I made terrible travel plans. I missed day zero entirely. So I missed the MVP Unconference, and some time with colleagues getting our stuff setup (I actually like basic physical setup projects). I also flew red-eyes out and back – I don’t know how I got through the second day I was there.

Next time I need to plan further ahead. Make sure I arrive on time for day zero. Make sure I have a reasonable flight there and make sure I have a reasonable flight home again.

I also didn’t play the swag game aggressively, and so I didn’t get as much “stuff” as some people. Frankly, I known I don’t need more stuff in my life, but somehow having still had room in my bag on the way home made me feel left out of something. Oh well.

To Sum Up My First Dreamforce

Several Salesforce mascots waving goodbye as folks left.

I met great new people.
I got to spend time with friends.
I learned new things.
I have ideas for future projects.
I helped support others.
I had fun.
I did not come home with COVID.
I did not come home with DreamFlu.

On the whole, what more can one ask?

Mid-Career Resumes

As we exit the Great Resignation, and move back to more traditional hiring patterns, application materials are increasingly important again. Over the course of my career I’ve been involved in a lot of hires, and read a large number of resumes. I know what I like to see, what I don’t like, and I have a bunch of friends in a similar position (although their likes and dislikes are sometimes different).

Recently, I realized that much of the advice online about resume writing is for people early in their career. That’s fair; they are the people with the least experience and need the most help. But as someone who is now mid-career, and reading resumes for other people who are also mid-career, I am noticing resumes from people who seem to still follow the early career advice.

So a few weeks ago I reached out to my friends who, like me, sometimes review mid-career resumes. While none of us are a full-time recruiter, we are the people who you need to impress if you want a job on our team. This post is a combination of my take, and the input I got from those people.

There are NO Hard Rules About Resumes

Resumes are not a regulated industry. There are no hard and fast rules. Any advice you see is just a set of suggestions. In the end, you have to decide what makes you look good and guess at what is effective.

Studies are rare, and even the best are poorly done. That is not the researchers’ fault. You cannot double blind a job hire. You cannot have 1,000 managers at different companies all hire for the same job from the same pool of applicants. Any one who knows a researcher is watching them work, likely changes their behaviors. Any study that finds bias creates legal risk for companies that participate which in turn limits participation and openness to data publication. List of problems with studying the process goes on and on.

  • Anyone who tells you there is one best way to create your resume, is wrong. 
  • Anyone who is entirely focused on the hiring manager, risks failing to give advice to beat automated filters.
  • Anyone who is entirely focused on beating the automated filter, ignores that nearly ½ of the jobs in America are at small companies and unlikely to use such filters. 

Write the best resume you can. Ask friends, particularly those who do hiring, for feedback. Consider paying a resume writer for help. But don’t expect even paid experts to be correct all the time.

Mid-Career Resumes Should Highlight Your Experience

The biggest mistake I see in resumes of people in mid-career, or even late career, is failing to highlight their experience. People who were at one employer for a long time struggle with this the most, but I’ve seen resumes for people with 15 years of experience that read like a recent graduate.

Your experience should be front and center. Everything about your resume should say “this is an experienced person.”

I like some form of summary at the top. Tell me what kind of employee and colleague you are. Not an objective section, but a summary of who you are. It can come in many forms: 

a short paragraph:

Salesforce MVP, developer, administrator, and consultant with 20 years of experience in the nonprofit and higher education sectors. Seven Salesforce certifications, experience in more then 20 programming languages. Proven experience leading teams and working closely with non-technical clients.

list of titles, or key phrases

Salesforce MVP, Technical Architect, Nonprofit Fundraising Expert

After that, your job experience and skills are next. How exactly you do this can vary. Some people like skills in a sidebar. Some people put a list at the top. Some people put that list after their job experience. Frankly, as a reader, I don’t care. But I want to be able to find your list of skills and your relevant job history fast.

Your currently valid certifications should be included near your skills. But only those the reviewer will find relevant. 

Think About Your Audience

Likely the person reading the resume of an experienced person is an experienced person. We have habits, routines, and work styles that are built on experience. We also have things like aging eyes, old printers, out of date external monitors, and other things that it are tempting to ignore.

Text should be high contrast, print well in black and white (there is a huge exception here for graphic designers, who benefit from showing off graphic design skills), and be generally easy to read. I don’t want your pretty three color graph, head shot, or blue text that prints light gray.

If I am reading a handful or resumes, I’ll do that on a screen and I can zoom in if I need. But if I’m digging through a big pile, I’ll print them. I will print them on my 20+ year old laser jet, blank and white, printer. When I last worked in an office and reviewed resumes, I used the office’s even older laser jet black and white printer. Your shaded background might make the whole thing unreadable on those devices. Besides, you should have too much experience to waste space on a picture (and that’s before we talk about companies trying to avoid identity based biasing who might not want reviewers to know what you look like too early in the process).

I strongly recommend going for simple, clean, classic, design approaches. 

Mid-Career Resumes Should be More Than One Page.

I haven’t used a one page resume in more than 20 years. I don’t know who is still saying one page is the magic number. A new graduate might benefit from the one-pager, but if you have 10-30 years work experience, and you only need one page to tell me, it better be the most amazing page of text you’ve ever created. When I see a one-page resume, before I see the words I see a person with limited experience.

Personally, I like the two pager. Two very full pages. I want to see that you were forced to edit and format aggressively to make it fit on two pages. You want me to think you have 5 pages of content, but you compressed it effectively.

Two pages gives you plenty of room to show off, without wasting my time. It shows me you can edit and filter content. Ideally, it’ll leave me wanting more information, that gives me questions I can ask in your interview.

Some people like longer. When I spoke with friends who hire, most people liked two pages. But some were open to 3-4. Beyond four you are into academic CV land, which is a different thing entirely.

Connect the Dots

You have experience, you are showing it off well, good. But are you showing off the right experience? One of the most consistent pieces of feedback I got from friends who do hiring is that we want to know you know who we are as an employer.

No every detail, but tell us what your public persona is. Is there a values statement in the job ad? Reflect some of that language back in a cover letter. Do we work in a specific market? Make sure to include some experience that connects you to that market. 

When I worked at a nonprofit, we wanted people excited by the work we did. Which means they needed to find ways to tell us in their resume, cover letter, application, and interview they knew something about that work. Since becoming a consultant, I’ve been consistently amazed that people will send resumes and come to interviews that don’t know what kind of customers we have.

Write a Cover Letter whenever Invited

This applies not just to mid-career applicants, but everyone else too. Not all jobs accept a cover letter, but when given the chance to say more: say more.  The numbers I can find on resume review suggest an average of 6-7 seconds. I think that’s low in practice (see comments on studies), I know when I dig through a large stack I find ways to filter out some very fast, and others get more careful review. So an average will likely be far from my median or modal times.  Even so, a resume that isn’t tossed out because it’s an applicant who is wildly unqualified, will get 15-30 seconds in my first pass.  You add a cover letter, now I’m spending more time reading. You could double, or even triple, the time you get in the first review 45-90 seconds – that’s huge.

It also means you can connect some additional dots for me. If your resume includes experience that you consider related, but that might not be obvious, you have a couple sentences now to tell me that story. Are you career pivoting? Tell me what about your old career makes you better than your experience suggests. Do you volunteer in your community? Tell me what about that helps you understand our work, or support our company values.

In Mid-Career Resumes the Basics Still Matter

Details matter: fix your typos, use consistent formatting, etc. I saw a resume recently with a red-line through their summary line. That’s a bad first impression.

Write resumes you want to read: If you have read resumes as part of your job, think about the ones that impressed you and mimic those.

Get feedback from a friend: You probably have friends and professional contacts who will give you blunt feedback. Ask for it. I did as part of writing this post.

Consider hiring an expert: There are people who do this for a living. Some of them are really good. When you ask your friends for feedback, ask them for references to services they used.

Not everything is needed: Edit down your experience. Keep the stuff that says you’re awesome, cut stuff that’s not relevant to the hiring manager.

References for More Thoughts on Mid-Career Resumes:

The internet is full of advice on resume writing. Most for beginners, but some for people with more experience.  Here are a few things I found useful:

The Queries Part 3 of 3

This is the third and final post in a series of posts to break down the questions from my Queries on Queries talk. The full talk is available here.

Is your solution reusable?

Migrations feel like one off processes, but teams that migrate once usually migrate again.

Have you ensured that as much of your solution as possible can be reused? Do you have a shared library of migration tools that your whole team can access? When you create new functionality are you thinking about ways to make it usable in your next project?

On any technology project you will generally benefit from designing for re-usability. I mentioned in my comments on the question about repeatability that people get tempted to see migration work as fundamentally one-off, but you need to plan for many runs. That question is focused on repeating the same project, this is about recycling parts of this project in another.

To a consultant, the value of reuse should be obvious: we like to sell projects to new clients based on successful projects for another client. For that I want libraries of tools the developer designed for rapidly assembled to meet a new client’s needs. 

But even when I was the client, I was moving similar data into the same systems over and over. I created API libraries, and rough interfaces, to handle some of that work so I didn’t have to do the same tedious work again and again.  

In both cases those libraries are only useful if whoever needs them knows they exist, has access to them, and can figure out how to leverage them.

Is your migration testable?

All good processes are rigorously tested.

Do you have an automated testing solution that validates your process? Can you tell if the data migrated accurately after each test run? Do your tests cover the positive and negative cases?

Testing migrations is hard. Testing software is hard. The testing tools that developers are most familiar with are unit testing tools, test one very small thing at a time. Multi-system data comparison is not their forté. The tools that do exist for such work tend to be quite expensive and/or so complex the task of creating tests is nearly as hard as the task of creating the migration jobs themselves.

But just because testing is hard does not mean you shouldn’t do what you can do within the budget and time you have. When you cannot use something like MuleSoft’s MUnit you can still create queries that sanity check the migrated and generated data. You select records for spot checking that cover edge cases you are aware of, and some that represent primary use cases. You can look for records that create invalid data states that would violate your new validation rules.

Is your work fixable?

Migrated data often needs to be updated after the jobs have all run.

Do you have a plan to fix your data if errors are found post migration? Does your plan include ensuring you have external Ids, or other connections, to be able to update all records of every type? Have you validated this plan will work in practice?

When you do a data migration, because everything is determinant, you feel like perfection is possible. But when you’re moving millions of records that were entered by humans, extracted by humans, mapped by humans, validated by humans, and represent human behaviors, there is a lot of room for human error.

You can either pretend your process is good enough to squeeze out the error, or build a process that allows you to fix the errors that slip through. Obviously I don’t believe the first is possible, so I encourage the second.

Make sure you can go back and update anything. If you’re migrating into a database that allows for a lot of easy changes – great. If you’re migrating into a financial system – make sure you understand the rules for editing. 

Planning for mistakes you don’t want to have makes it far easier to recover from those mistakes when they appear.

The Queries Part 2 of 3

This is the second in a series of posts to break down the questions from my Queries on Queries talk. The full talk is available here.

Is your work repeatable?

You will need to do this more than once.

Is your process designed so you can run it over and over without error? Can you easily erase test attempts and start over from a clean slate? Do you have the capacity to do all the practice runs you need to complete your project successfully and on schedule?

Because a migration is fundamentally a one-way operation, designed to move data once, it’s tempting to build the whole process as a one-off affair. I’ve seen (even used) migration processes that required hours or days of hand polishing data to get it to load – this is a terribly way to do the job.

A good migration process should be automated. To automate anything you need to test it. If you test something you should expect it to fail many times before it works. And when it fails you need to run it again and again until it works.

By their very nature data migrations create data – in a target system no less – and so you need a way to roll back your changes to migration to a pre-run state for each subsequent test. I like to use a staging database for the main complex parts of my migrations. I created Salesforce2Sql just to make that so easy no one would be tempted to skip that step. When I create processes in an ETL, I like to have jobs start by deleting data from the staging database related to the job, so I can make Idempotent jobs as much as possible. Run, test, adjust, repeat. If you know how many times you ran your migration process, you didn’t run the jobs enough.

Is your work measurable?

To know you moved all the data, you must know how much data is going in and how much should come out.

Can you accurately predict your output data volume based on the input size? Do you have valid estimates of the running time required for each stage based on the data volumes? Are the estimates of expected data set size from a reliable source?

It seems like knowing how to measure your work should be obvious, but in truth most interesting migrations are not a simple record-in, record-out – they involve splitting records, combining tables, filtering data, converting tables to fields, fields to tables, and other similar adjustments. But the only way to know if you got it all to work out right is to work out the math wherever you can.

It’s also important to know how long a process will take. Sometimes a few thousand records here or there doesn’t matter much, but sometimes that is a matter of hours. Particularly when running samples it’s important to know the average running time. I’m working on a project right now where we know that the first 3 million records will load in about 6 hours, the last 45,000 records will take 12 hours. 

In that project we’ve worked out those running times, and we have a good understanding of total records counts. In other projects we thought we knew, only to discover the person giving us the source record counts was talking about the per-year instead of total expected migration size. But with per-record estimates we can adjust expectations quickly when information changes.

Do you scope your data migrations carefully?

Limiting bad data in your system allows for better decisions in the future.

Do you only load data into the new system that you truly need? Can you easily spot the difference between new and old records? Are there data points getting loaded that have no use case or maintenance plan in the target system?

Everyone wants to keep all their data. My entire career I have understood that storage is cheap, and big data is king. AI driven data analytics have been around for a few years, and now we have all the attention on generative AIs, both benefit from large data sets.

These all tools are great, but they aren’t magic.

Big data processing, whether it be AI driven or not, is all about correlations. If you give a correlation engine bad data, it will give you bad results. Garbage in is still garbage out.

You only want to migrate data that’s good.  
You only want to migrate data that’s useful.
You only want to migrate data that you will maintain.

So before you start a migration make sure you know your data will fall into those categories. Organizations can always archive data they don’t migrate.

There are other reasons more data isn’t always better. 

If your system, or data archive, is ever breached that presents a risk to an organization. Privacy laws are steadily tightening, increasing the chances you will have to admit to your audience you were the cause of their information falling into the hands of bad actors. 

Also, old data is often bad data. Colleges often have the email address used by their applicants squirreled away in their alumni systems.  How useful do you think the AOL address I used in 1997 is to Hamilton College today? If they use it, they will fail to reach me. It provides them no value, but does provide them the chance to make mistakes. Same is true of old phone numbers, addresses, and more.

Keep the good stuff, let go of the stuff you don’t need.

The Queries Part 1 of 3

This is the first in a series of posts to break down the questions from my Queries on Queries talk. The full talk is available here.

Are your tools good enough?

Our migrations live and die by our tools.

Are your tools built for the scale of your project? Do they empower you to do your best work or impede rapid progress? Would a new tool serve you better now or in the future?

Having the right tools is critical to any job. In data migration we primarily talk about ETLs (Extract, Transform, and Load): tools like Jitterbit, Informatica, Mulesoft, Talend, etc. We also use additional tools to help support the process: a task tracker like Jira, a Data Modeler like Lucidchart, staging database prep like Salesforce2Sql, and more.

It’s easy to say that it’s a poor carpenter who blames his tools, but anyone who has spent time with actual carpenters knows they care a great deal about what tools they use. They might be able to make due with poor tools, but they will do their best work with the right tools for the job.

Each tool you use needs to meet your team’s needs. It should play to your strengths, supports the kinds of projects do you do, and has an eye to the future. A tool that works great for a team of declarative Salesforce consultants might drive developers crazy. A tool that works great for 10’s of thousands of records might struggle with millions; a tool scaled for 10s of millions of records may be overly complex for a project of 30,000.

Make sure you’re using the tools that let you do your best work, now and in the future.

Do you make the data atomic for processing?

Smaller pieces of data are easier to track, manipulate, and test.

Do you divide the source data into its constituent parts? Can you process individual pieces of data easily and cleanly? Can you stop your process after each stage to validate the results?

It can be tempting to process data as it comes: handling whole rows of data in the form they were provided and treating fields as a single data point. In practice exports may have extra rows or columns to deal with related records. Organizations may have encoded multiple points of data into fields like ticket names including a show name, date, and time into the name field. Fields can also contained semi-structured data, like Joomla’s use of arbitrary JSON blobs.

To process this data it is often easier and clearer to extract it from these structures prior to direct processing. It’s not always needed, and rarely required, but doing this clean up of structure – like creating interstitial database tables or predictable data objects – can greatly ease the rest of your job.

Like many problems in software engineering, it’s easier to do good work when you are operating on atomic pieces. Think about the right ways to pull your data into constituent parts when they aren’t there already.

Can you process samples of your data set?

When you have lots of data you need to test small parts to be sure your process works.

Do you know how to create and run small segments of your total input? Are your segments made up of complete and valid samples? Does your sample include all the errors and edge cases your data set will throw at your process?

If you are working with small data sets your sample can be all the data. But when you have a large data set you need to test your process with samples. When you have a multi-step migration you likely need to test the second phase while the first phase is still under construction – again a sample data set is critical.

Having valid test data, that covers all your edge cases, is critical to making sure you have a working solution.

A few years ago I worked on a project that involved a two stage migration for a membership organization with some 600,000 active contacts. Every one of them needed to be migrated into Salesforce and then into Drupal. To test the Drupal migration we needed samples of all the types of membership statuses we would see, which involved hand creating several hundred records. At the next Salesforce Commons Sprint I raised the idea of needing a better tool for this kind of work, that question eventually helped lead to Paul Prescod‘s creation of Snowfakery. Snowfakery will build you testing data sets of any size and complexity to make sure your processes will succeed.