Last November I wrote a bit about creating Salesforce data with Snowfakery. I’ve continued to use the tool for work, provide feedback to the project maintainer, and help the Salesforce Open Source Commons Data Generation Toolkit Project as we started to build a library of sample recipes. Hopefully I will have more to say on that after the next Community Sprint.
Snowfakery not only gives you a way create carefully shaped relational data sets of nearly any size, it also allows you to create plugins to extend its abilities. those plugins come in two flavors: Snowfakery Plugins, and Faker Providers.
For more technical details you may want to read the project has documentation. My intention here is to provide an end-to-end example of how to make them work.
This article started out as one long piece but to keep it focused I’ve decided to break it into two parts:
- Part 1 covers Snowfakery Plugins.
- Part 2 covers creating custom Faker Providers for Snowfakery projects.
The code for both parts is on Github if you want to see the project as a whole.
Things you’ll need
- Python 3 (any recent-ish version should be fine), and the experience to read and write simple Python scripts (they aren’t any harder to follow than YML just different).
- Snowfakery 1.12 or later. Note: if you have CCI installed it contains Snowfakery but on Windows you may need extra setup.
- A code editor you like that supports both Python and YML (which is pretty much anything good).
- You probably want experience working on at least one or two Snowfakery recipes.
Snowfakery Plugin Project Structure
This setup just talks about Snowfakery recipes on their own, not within a larger project, but the concepts are the same even if the details are different.
Snowfakery looks for plugins in a select number of places:
- The Python path.
- In a
pluginsdirectory in the same directory as the recipe. - In a
pluginsdirectory below the current working directory. - A sub-directory of the user’s home directory called
.snowfakery/plugins.
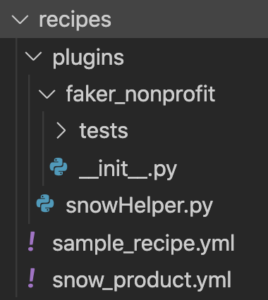
For this example the plugins directory will live within the folder with our recipe (called recipes), but you can move the plugins directory up a level and it will work just as well.
To get started, in your project create a recipes directory. Next create a plugins directory within recipes. Until part 2 you can ignore the faker_nonprofit directory in the screenshot on the right, but that’s generally what we’re doing.
Create Your First Snowfakery Plugin
In the Snowfakery community we use a lot of snow-based puns to name things. So to help create fake sounding products for our projects we might need a simple plugin to generate us new words that match our general naming convention.
In the plugins directory create a new file called snowHelper.py. And copy the follow Python code into your editor:
from snowfakery import SnowfakeryPlugin

class SnowPunnary(SnowfakeryPlugin):
   class Functions:
       def snowpunner(self, word):
           return 'Snow' + word
The code here is pretty straight forward if a little nested. We are loading the SnowfakeryPlugin class from Snowfakery itself, and then extending that class to create our plugin. Snowfakery assumes that the plugin has a subclass to hold your plugin functions (called Functions) and that you add your functions to that subclass. Your functions can have a parameter (here the word being punned on) to accept inputs from other parts of the recipe.
Our SnowProduct Recipe
Now we need a recipe that will actually use our plugin. In the recipes directory create a file called snow_product.yml and copy in the following YAML code:
- plugin: snowHelper.SnowPunnary

- object: Product
  count: 10
  fields:
    Name:
      SnowPunnary.snowpunner: ${{fake.word}}
In the first line we load our plugin using Python’s module naming convention – because it is getting loaded as a Python module. The pattern here is the file name (without file extension) then the class name. In the last line we then call the plugin’s function by referencing the class name and the function name.
You can run the file directly in Snowfakery and see the outputs:
$ snowfakery snow_product.yml
Product(id=1, Name=Snowplantary)
Product(id=2, Name=Snowbadary)
Product(id=3, Name=Snowmillionary)
Product(id=4, Name=Snoweffortary)
Product(id=5, Name=Snowgreenary)
Product(id=6, Name=Snowbehaviorary)
Product(id=7, Name=Snowcouldary)
Product(id=8, Name=Snowforceary)
Product(id=9, Name=Snowyesary)
Product(id=10, Name=Snowcompanyary)
I’m going to show, but not go into great depth on, one more detail: plugins can save state. Snowfakery provides a mechanism for tracking context variables between calls that allow you to track current state. So we can have ours count the number of times the snowpunner function has been called and return that count in another function:
from snowfakery import SnowfakeryPlugin

class SnowPunnary(SnowfakeryPlugin):
   class Functions:
       def snowpunner(self, word):
           context_vars = self.context.context_vars()
           context_vars.setdefault("count", 0)
           context_vars["count"] += 1
           return 'Snow' + word

       def currentCounter(self):
           context_vars = self.context.context_vars()
           return context_vars["count"]
Then update the recipe like this:
- object: Product
  count: 10
  fields:
    Name:
      SnowPunnary.snowpunner: ${{fake.word}}
    Index:
      ${{SnowPunnary.currentCounter()}}
Notice that to call the function without a parameter we use the formula syntax. Run it again and we see the new index that shows the count:
$ snowfakery snow_product.yml
Product(id=1, Name=1: Snowimpact, Index=1)
Product(id=2, Name=2: Snowfund, Index=2)
Product(id=3, Name=3: Snowdark, Index=3)
Product(id=4, Name=4: Snowteach, Index=4)
Product(id=5, Name=5: Snowteam, Index=5)
Product(id=6, Name=6: Snowsummer, Index=6)
Product(id=7, Name=7: Snownew, Index=7)
Product(id=8, Name=8: Snowperform, Index=8)
Product(id=9, Name=9: Snowonto, Index=9)
Product(id=10, Name=10: Snowmodel, Index=10)
It is important to remember that while it would be possible to add a value to the context variable on each iteration, that would cause Snowfakery to consume more memory on each iteration. Snowfakery is designed to generate records by the hundreds of millions if asked, and does so while consuming very little extra memory – you can do things in context variables that would break down on larger runs.
In part 2, I talk about creating a custom Faker Provider and loading it into a Snowfakery recipe.