Sometimes we learn best from counter examples. Col. Flagg was an recurring character on M*A*S*H. He was a CID man with Army Intelligence, and spent much of his time bloviating about his suspicions about everyone while threatening to kill people for fun.
Flagg seemed to have taken every piece of tactical advice he was ever given to absolute extreme. It leads him apply his most aggressive techniques – like threats of torture, or attempts at bribery – to every situation he encounters.
Consultants get a lot of good tactical advice about how to address our clients and our work. But if we take things too far we are only slightly less clueless than Flagg.
Col. Flagg’s Over-Generalization
Probably the best example of Flagg’s constant misapplication of techniques by generalizing their use is in The Abduction of Margret Houlihan from season 5. Chief Nurse Margret Houlihan hurries off late at night to deliver a baby in a nearby village, telling only the guard, Kilnger, who promptly goes to bed. When no one can find her in the morning, Potter calls for help searching for her. The army’s answer is to send Col. Flagg. He arrives, dressed as Mussolini, claiming to look like a Chinese double agent (if that agent chose the same get up), and proceeds to request the provisioning of several items clearly planning to torture someone.
Flagg spends the day wondering around, threatening everyone he talks with, trying to get information about Houlihan. He never finds anything of use, but does get in a number of good one-liners.
Finally Houlihan, who was never in any danger, returns to camp unaided. Flagg declares victory, throws himself out a window – so know one will see him leave – and breaks his leg.
Anyone who had been a consultant long enough can find parallels between Flagg’s useless bloviating, and consultants who try to address every client project as interchangeable.
Col. Flagg Consulting
Good advice often is context specific – you need to know when and how to use it.
Anytime I am in a meeting with a client, and I recognize that a piece of stock advice may apply, I try to reflect on the context of the moment. Does the advice actually apply, or would a different approach be better.
For example, consultants are often told to never say “I don’t know” in front of a client when asked a question we are unsure how to answer. Instead we are taught to say “I need to get back to you about that” or “let me verify with another team member before I respond.”
Up to a point this makes sense. We are paid experts; clients don’t want hire someone who does not know how to complete the job. Often making a space to make sure you are correct is the right response to an unknown. It’s far better than making up wrong answers. And, more often, better than making a client nervous because you haven’t had 30 seconds to Google the answer.
But clients can also smell something is fishy if you always claim to know everything. When I was a client, I never trusted consultants who pretended that they had seen and done everything. I knew they were lying to me because no one knows everything – leaving me to sort truth from fiction. That never ended well for the consultant.
“Nobody gets the truth out of me. I keep myself in a constant state of confusion.”
Col. Flagg
Consultants who cannot track context and adjust their approach accordingly, risk consulting like Col. Flagg.
M*A*S*H Consulting
If you didn’t know, or can’t guess from context, my wife and I are M*A*S*H fans. We grew up with it. We bought the DVDs as they Fox released them. It’s our go-to for something comforting to watch. It’s entertaining, and full of great lines and moments to borrow for life examples. As part of marking the show’s 50th anniversary this is the second in a short series of posts using consulting lessons from characters in M*A*S*H.
Father John Patrick Francis Mulcahy (aka Father Francis John Patrick Mulcahy depending on the season), spent 11 seasons of M*A*S*H trying to balance his two realities. He was a priest, opposed to violence (aside from boxing), thrust into a war zone. As the 4077th chaplain he was responsible for the spiritual and emotional care of more or less everyone else. Father Mulcahy spends many scenes helping in OR. He supports the doctors however he can; he brings supplies and drinks to the staff; offers prayers for the dying; even assisting in surgeries at times.
Mulcahy’s Balance
Throughout the show his story is one of a man struggling to find balance – sometimes he does it well, sometimes he misses. The writers make his goal most clear in the episode Heroes. A former boxing champion has come to came on a USO tour stop and has a stroke that is eventually fatal. As the boxer lays in a coma, he explains the influence the champ had had on his world view.
Mulcahy talks about his struggle with the idealism in Plato and his desire not to be beaten up at school. He tells the story of the first professional fight he’d seen. The now dying champ, had asked the ref to stop the fight so he didn’t hurt his opponent too badly.
“And I realized for the first time, that it was possible to defend myself and still maintain my principles. … That was when I made up my mind to keep one foot in the ideal plane and the other foot in the real world.”
Father Mulcahy
Mulcahy Consulting
Consulting is, obviously, less challenging than Father Mulcahy’s world. But M*A*S*H has a lot of useful ideas to use to inspire us in our lives. If you aren’t familiar with the show, I highly recommend it (although new viewers might start in Season 2 or 3 since it took them a season to find their feet).
Balancing the ideal and the practical is one of the challenges in consulting. We can often see an ideal solution for a client, but the client doesn’t have the time or budget to reach that ideal. Our job is then to find a balance between that ideal solution and meeting deadlines and controlling budget. We need to keep one foot on the ideal technical plane, and the other in our practical world.
Like Mulcahy, sometimes we get frustrated that we can’t do our best work for doing for reasons that feel short-sighted. Finding ways to work on personal projects or other things that allow you to be technically purest can help keep skills sharp and scratch itches can help. Unlike Father Mulcahy, leave the choice to charge into other people’s battles to rescue a wounded soldier to the properly trained.
We may sometimes error in the other direction. Like Mulcahy trying to write the perfect sermon during a visit from a cardinal, and miss the place we should really be (hopefully we can pull it together as well as he does). It’s easy to get focused on our own goals, and miss a client’s needs go in a totally different direction. But it’s our job as consultants to course correct and deliver on our obligations.
In the end try to consult like Father Mulcahy would.
M*A*S*H Consulting
If you didn’t know, or can’t guess from context, my wife and I are M*A*S*H fans. We grew up with it. We bought the DVDs as they Fox released them. It’s our go-to for something comforting to watch. It’s entertaining, and full of great lines and moments to borrow for life examples. As part of marking the show’s 50th anniversary this is the first in a short series of posts (not sure how many yet – at least two maybe more) using consulting lessons from characters in M*A*S*H (likely avoiding some of the obvious choices like the doctors for things we can take from others).
A few weeks ago I asked some friends in various professional circles about their thoughts on programming languages. “What’s your personal theory about learning new languages? Have you ever learned enough? How often should you learn a new one? How do you count languages you last used 5+ years ago? What’s reasonable to expect of other developers?”
The responses ranged widely, but generally all agreed we benefit from learning more languages throughout our careers, but particularly when we are starting out. Not surprisingly the clarity of thinking ranged as well with more experienced programmers being clear about the value they had taken from different languages they had used over time.
My Experience with Languages
During my first job after college Frank Weber, an AFSC volunteer who served as a mentor of mine, suggested that I should learn a new language every year. As I work with developers who are earlier in their career than I am, I have been trying to decide how important Frank’s advice was: I’ve settled on extremely important.
This portrait of Kahlil Gibran I saw on display at the Telfair Academy. His writings influenced my thinking about language and poetry, but always in my native language not his.
As a kid I was taught and learned a small number of languages like BASIC, Logo, and HyperTalk. In college, I learned several more including 8 in the course of a 16 week semester – a rough but useful experience. After college, when Frank told me to learn a language a year, I did that for several years. My career has largely centered around languages I taught myself basically on my own post-college.
As a result, at one point or another, I have written programs in more than 20 different programming languages. I can learn new languages quickly, in part because it is rare for me to encounter a language that has constructs I haven’t used previously. Along the way I discovered I can even help people use a language I don’t know just based on the patterns I know from other languages.
On the other hand, I have tried to learn three human languages in addition to English: French, Russian, and Spanish – all went terribly. And my inconsistent attempts to learn some ASL have fallen in the middle: I had some success, but never put in enough effort to learn it well.
That dichotomy makes it tempting to emphasize the differences between these two types of language. In ways they are very different. Human languages evolve naturally over time; machine languages have rigidly defined rules. Human languages try to help us express the full range of our experience; machine languages are designed to get a machine to do complete tasks.
But many concepts connect the two sets. Machine languages, like spoken languages, are tools created by people to express themselves. We label their structures as grammar in both, because we stole the formalization concepts from traditional languages when we invented programming languages. They both evolve over time. At this point they both borrow concepts from one another.
Growing Language Understanding
The thing that shifted for me recently was listening to a Hidden Brain episode Watch Your Mouthabout human languages. The first section featured Lera Boroditsky talking about the impact spoken languages have on how people think. She cites examples of cultural understanding of ideas around direction and gender. There are similar ideas about our emotions that are also linked with the language we use to describe our emotions.
That had very direct correlations to programming. Hearing those discussions catalyzed the thinking I was already doing.
How I see and solve a problem in code can vary greatly with the language and platform I’m using. A Python application running on a server can use a radically different approach from a solution built in Apex on Salesforce. JavaScript running in a browser requires different solutions and details from solving that same problem in JavaScript running in a Node environment. Java largely frees you of worrying about memory handling, while many languages in the C-family force you to consider the storage implications of nearly every byte. At times when trying to work through a problem in one framework it can help think of how I’d solve it in another better suited to the task.
The second half of the Watch Your Mouth episode included a discussion of how languages change over time. It’s an interview with Linguist John McWhorter, and his work at looking at how language changes over time. He pushes back on the notion that we should all use the version of English someone tried to teach us in school:
“It’s a matter of fashion, pure and simple. People do need to be taught what the socially acceptable forms are. But what we should teach is not that the good way is logical and the way that you’re comfortable doing it is illogical. It should just be, here is the natural way, then there’s some things that you’re supposed to do in public because that’s the way it is, whether it’s fair or not.“
John McWhorter
Programming languages have fashions and patterns – and they are rarely fair. A new language like Go will become popular in part because it’s new and used by a popular company. An older language will go out of fashion like C++ or Java, because newer languages feel more graceful even if there are technical trade-offs for that grace. They evolve, more formally than English but less formally than people pretend. Just because there is a standards committee does not mean that committee is purely selecting the “best” solution.
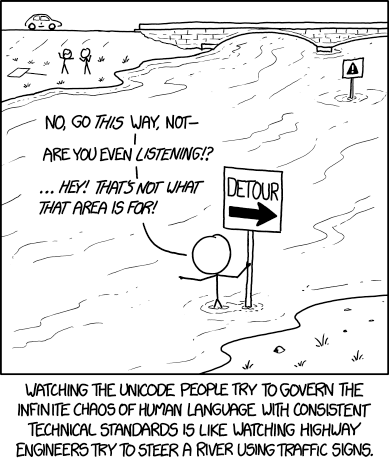
Technical Intersections Between Languages
There is also a point where all these languages intersect: Unicode. Unicode tries to give us ways to express human languages in machine form – all written language. Every developer should understand how language is stored in files because our code is stored in that format, our servers talk to each other in that format, and humans will express themselves to our applications in that format.
My Theory on Programming Language Acquisition
Like plumbers, electricians, doctors, nurses, and really anyone with a career: Developers need to master the tools and techniques of their trade. Programming languages are tools, and the techniques we learn from one make us better in another. We do not have to like the language designs we encounter, but we need to understand them.
Every developer should teach themself a new language on a regular basis, either for work or for their own education. We should pick languages that are uncomfortable to us. Some should be new and popular, some should be old and foundational.
So if you’re a developer, go learn a new language. If you’re not a developer, go learn something different from what you use every day. It’ll force you out of your comfort zone and get you to learn more than you expect.
Languages I’ve written one or more programs in:
Just for fun, here’s the list of languages I can remember writing something substantive in:
If you look over this blog, or know me, you will see that I’ve now have reasonably significant experience as both a Salesforce and Drupal developer. The last couple weeks I have been thinking about what from my Drupal experience supports my work as a Salesforce developer.
I think there are three parallels that are encouraged in Drupal developers that helped me learn to be a good Salesforce developer quickly.
Embrace, don’t fight, Platform Constraints
Extend the Platform’s Strengths
Leverage Events
Embrace Salesforce Platform Constraints
Both Drupal and Salesforce run in constrained environments. Web applications, regardless of their purpose, have to protect themselves against bad actors and bad neighbors. There are execution timeouts and memory limits, for both platforms. Salesforce adds a variety of additional limits and governors, but they are all logical extensions about memory and time. Lots of other platforms allow developers to ignore resource use until they reach a crisis point. Don’t believe me, just check the memory used by Chrome, Electron Apps, or any other Chromium-based application.
Working in resource constrained environments forces you to think through how to use the resources you do have efficiently. While these platforms aren’t like working on hardware with highly limited resources, they still can test your resourcefulness.
Drupal and Salesforce both provide ways to run large jobs across many processing contexts. New developers on both platforms often only resort to using batch and queueable operations as a last resort, but learning to use those solutions is critical to success on most interesting projects. When you try to avoid them you create solutions that appear to work and fail at scale.
Coming to Salesforce from Drupal, I already knew and understood the importance of asynchronous batch processing. So when solutions needed batch processing it was second nature to learn that part of the platform.
Extend the Platform’s Strengths
For all Salesforce’s push and marketing to avoid code, Salesforce developers are often taught that once you write code you just do everything in your code. The interfaces you can use to extend the platform’s existing solutions are treated as advanced topics. But when you work with Drupal, you are encouraged from the start to create modules that build on and extend the platform’s existing strength. Drupal developers are encouraged to leverage the features and utilities all around them.
This has always been true, but even more after Drupal’s move to leverage Symphony plugins and services. As a developer used to extending the platform, I came to Salesforce looking for ways to extend the platform’s declarative tools.
Often Salesforce developers create powerful solutions built purely in code triggered by record changes or simple buttons. They look passed Apex Actions that extend the Flow declarative automatons, platform events, and other tools that extend the system. But when you embrace a platform’s basic structures you often create more flexible solutions than your could with pure code.
The mind set of extending a platform, which I brought with me from my Drupal work helps me create tools and solutions that are designed to adapt over time.
Leverage Events
Event driven architectures are not new, but their popularity continues to grow. Where platforms used to follow informal patterns that equated to event systems, now we see formal event structures being build to replace old habits.
Drupal and Salesforce both have had event frameworks for a long time: Drupal had hooks (events by naming convention), Salesforce had triggers.
Both have seen major upgrades to their event patterns in recent versions. Platform events in Salesforce, still making their full power clear to a lot of developers. Symphony brought proper events to Drupal in version 8 and continue to help push the platform forward.
I have learned to leverage the events systems on both platforms. Understanding them as tightly constrained state machines, and learning to push them to their limits, helps me get the most from both platforms.
My experience with Drupal hooks and events has made it obvious to me when to leverage Salesforce’s Platform events. As Salesforce increases the number of places you can use them in their declarative tools, it increases the value of this approach.
So What?
As a developer, what you learn in one part of your career can make you stronger in the next. As a field we’re not actually that creative. Even if the details are different, the concepts will often carry forward because they are built on the same fundamentals. Whatever platform you are using today, learn how to make it sing – it’ll help you learn the next faster and better.
I consider listening to good podcasts to be part of my ongoing liberal arts education. We all can benefit from being conversant on many topics, understanding their interplay, conflicts, and mutual inspiration. That broad understand allows us to be more informed voters and more flexible contributors at work. It also just makes me happier.
I make a point of mostly listening to things outside my field of work. I study my work 40+ hours a week already. In my spare time I like to learn other things. Right now my rotation includes shows like Hidden Brain, People I Mostly Admire, Freakonomics, Wait Wait Don’t Tell Me, and more.
I tend to listen to things in fits and starts and then suddenly in waves. If I walk the dogs alone I’ll listen to parts of an episode. While mowing the lawn I’ll squeeze in a couple things. But it’s really the long drives that let me pack in a lot of information. For example, at the end of June I had to do a 12 hour drive on my own, twice. So I got caught up on some episodes that had been building up on my phone.
One of the things I like about listening to these shows is different perspectives on different topics. They provide me a chance to hear overlapping ideas that inspire new ideas related to my work or life. Sometimes those overlaps build on each other, other times conflicts in ideas push me to think deeper about both sides.
Currently, economic growth is like 2 percent, 3 percent per year. What happens if that continues for just 10,000 more years? Well, 2 percent compounded over such a long time gets to a very large number indeed where it would mean that for every atom within 10,000 light years — so, every accessible atom within that time would have to produce the economic output of some enormously large number. I think it’s something like 10 to the power of 60. But just think trillions times trillions times trillions of amounts of output as the entire world economy today. And now, I’m not claiming I’m certain that’s impossible. The world today is magical and fantastic and would be judged as such from the perspective of people 1,000 years ago. But it seems really unlikely that every single atom is able to produce many trillion times the economic output of the world today.
Will MacAskill
It was a compelling enough argument to get a Chicago Economist to question his assumption that economic growth is a given.
But it’s funny because, as an economist, I’ve been so indoctrinated into this idea that economic growth is natural, it’s good, it’s part of life, that just something should have been totally obvious to me, but wasn’t because of my indoctrination, all it took was a few lucid arguments from you.
Steve Levitt
During the drives in June, I wandered through several hours of Hidden Brian. The episode that stuck with me was, Do Less featuring Leidy Klotz talking about the power of subtraction from designs. But it’s not just the singular interviews that I find useful. Listening to large amounts of divergent information causes ideas to cross pollinate. The Klotz interview connected in my head with an episode of People I (Mostly) Admire featuring Dan Gilbert, Turning Work into Play, which included the advice to do less, better.
Well, I’m loath to give advice because I’m telling you what worked for me. And that doesn’t necessarily mean it works for anybody else. But I do suspect that many, many people would be much happier if they did less, better.
Dan Gilbert
That whole line of thinking has me trying to re-frame how I talk about building tools as part of my job. How can I make my work better by removing tasks? I even started to write a response piece in my head, which may come together some day.
As a Salesforce Developer (and a Web Developer before that, and a Nonprofit Communications staff person before that), I get encouraged to listen to a very small set of information. People assume I listen to Salesforce Podcasts and not much more. Many of us are encouraged to spend our personal time learning about our work – usually narrowly about the sub-field we’re in.
My point isn’t that they are always right, nor that I’ve picked shows presented by people I always agree with. The guests and hosts in the podcasts often express interesting ideas, but also have view points I disagree with or ideas that conflict. For example, I find that Steve Levitt (who I mostly admire) has an overly simplistic view on gun violence. Shankar Vedantam often has guests on Hidden Brain whose ideas conflict with other guests. My point is that listening to these ideas, letting them challenge my thinking, and building on them my life better.
Life is big and complicated, and involves a lot of not-work. Go find some things worth learning about that aren’t part of your regular activities. See where it takes you.
Salesforce2Sql is a tool dedicated to doing one thing very well: mirroring Salesforce schema.
A little over a year ago I started work on Salesforce2Sql to help support people doing data work with Salesforce. Salesforce2Sql is a simple Electron app that allows you to clone the schema of a Salesforce org into an SQL database (currently supports MySql/MariaDB and Postgres). These mirrors are useful when you want to stage data during migrations in or out of Salesforce.
When is Salesforce2Sql useful
Salesforce2Sql is a tool dedicated to doing one thing very well: mirroring Salesforce schema. It does not attempt to extract data or convert data in any way.
Salesforce provides excellent APIs for data import and export, but they work best with some prep work first. Salesforce2Sql gives you a staging database that mimics your Salesforce schema. In these schema mirrors you can prepare all your data for high speed processing off-platform. Anyone who is looking to move data into or out of Salesforce at high speeds and large volumes benefits from this setup.
I have seen people write large complex ETL jobs meant to go right from one source system into Salesforce. These jobs can be hard to test and they are slow to run. They generally don’t give you an easy way to review the data before you push to Salesforce. By landing the data in a database clone you can break the jobs into stages, review transformations before they are loaded, and run thousands of iterations for testing instead of dozens.
Setup
Salesforce2Sql is built and released for MacOS, Windows, and Linux (most testing is on Mac and Windows). You can download the installers from the current release and follow the standard patterns for your OS. From there start the application to get to work.
You will also need API access to a Salesforce org and a database to create your schema within.
Basic Salesforce2Sql Use
As of this writing Salesforce2Sql uses the old security token connection method. I would like to add OAuth2 support as well but haven’t gotten that done; contributions are welcome. So with the application running, and your security token in hand, click the big “Create New Connection” button on the left side of the main interface.
Salesforce2Sql Main Screen
Step 1: Fetch all objects
Once connected click “Fetch Objects”, and the tool will download a list of every object in your org. There will be several hundred. So the next step is to select which you want to mirror. You will notice Salesforce2Sql selected defaults for you (well I did). It will select all custom objects and based on your org’s structure Salesforce2Sql guess which standard objects to select. There is a search box at the top right to help you find any others you’d like to add but simply checking the box.
Step 2: Fetch all fields
Click the next button to move to the Proposed Schema tab, and then the “Fetch Details” button. Now Salesforce2Sql will query every field on every object you just selected (this may take a moment but honestly I find it much faster than I expected when I first started this project). Once that is complete you can either save that schema to JSON for later re-use, or click Next to move to the “Generated Database” tab.
Step 3: Generate tables
This is the last step. Click “Create Tables” and Salesforce2Sql will ask you for your database credentials. Once you click okay on this final screen the tool will attempt to create all those tables for you. Again this will take a couple minutes if you have a large schema. Once the process is complete you can also save the SQL statements for editing and/or later re-use.
That’s it, you now have a database with a schema that matches your org’s structure.
Preferences
There are a few preferences you might want to experiment with (although I tried to pick smart defaults) when building mirrors. For me the right choices depend on my use case.
Picklists
Salesforce Picklists are a bit of a special beast. The obvious choice is to make a picklist into a SQL Enum to support validation of data. But not all picklists are restricted in Salesforce and aren’t always required. By default the tool will use enum for restricted picklists, varchar for unrestricted picklists, and add blank values to all picklists (since it can’t easily determine if a given picklist is required or not across all page layouts).
If the picklist values in your org are pretty much set, the default settings make a lot of sense. If the picklist values in your org are likely to change you might want to make them all into regular varchar columns.
Auto Indexing
The next important section contains the index settings. While it is possible to over-index a database I think the three sets of default indexes are pretty good guesses: Id columns, external Ids, and picklists. The one you are most likely not to care about are the enums, and therefore the one you might consider disabling if you aren’t processing on those fields at all. Id columns are now case-sensitive even in MySQL by default as of version 0.7.0 since Salesforce Ids are case sensitive.
Additional Settings
The other defaults section let’s you pick a few other system behaviors. The most common to fuss with are first and last in the box.
By default it expects Lookup fields to be 18 character Salesforce Ids – cause that’s what they will be in Salesforce. But during a data migration some people like to put legacy Ids into these fields (I recommend a proper legacy Id field marked as an external Id) so I give the option to use 255 characters instead of 18.
Salesforce also has two categories of fields that are common to ignore in a migration and you may wish to keep out of your database just for ease of use: the audit fields (createdBy and the like) and read-only fields (like formulas). The final two checkboxes in that other defaults section lets you keep those fields out of your clone schema.
The middle two fields control the behavior of field defaults – generally I like these two settings as is in just about every use case, but you may feel differently.
Salesforce2Sql uses Bootswatch themes for design elements. The preference pane also lets you pick a different look-and-feel from their theme list.
Final Notes
There are a couple other details worth knowing.
First, if the process runs into a problem where the SQL engine complains about row size limits Salesforce2Sql will automatically switch all varchar fields to TEXT fields in an attempt to reduce the row size. That will override all preference settings for these fields.
Second, Knex.js – which Salesforce2Sql uses to handle the actual SQL writing – adds indexes as a table alter even when they could be part of the create statement. This makes the process a bit slow and it means that if there are errors during the creation of indexes you may see some errors in the interface but leave you with a pretty-good schema clone.
Finally, yes there is lots of room for improvement. I work on this project when I can, or when I need a bug fixed for my own work. I am excited to get suggestions, ideas, feedback, documentation edits, and code submissions.
During a recent department event my wife introduced me to the sister of one of her students. The event was an award ceremony for some of the history and political science majors – the student’s sister was along to support her brother (and as a smart college student get a free meal outside the dinning hall).
As a CS major, this student is trying to understand her options for what kind of programming she might be interested in. As a good professor my wife introduced us so the CS major wouldn’t have to pretend to be as excited about history as everyone else present. Listening to me talk about what I’ve done in my work she commented that maybe she should be a web developer – my reply was that she should do the work with problems she finds interesting.
Dodge the Gate Keepers
Like many people who are going through a CS education she has been surrounded by people who are confused about the difference between IT and CS. She talked about going to a conference and running into a bunch of guys who belittled her because she wasn’t into computer hardware. Apparently one even criticized her for misstating the directionality of a Lightning adapter (I can’t remember the last time I cared about cable directionality in a digital connector). My suggestion that was old, familiar, and involved one finger. I also pointed out the guy was probably just wrong.
That kind of adolescent gate keeping out of other college students isn’t surprising, but it is annoying. I work in a field that’s short handed, and we need smart people interesting creating great systems. We were short handed before the whole U.S. economy started to run short on workers.
From a short conversation I could tell she was smart, capable, and friendly – exactly the kind of person any employer will be lucky to have some day soon. But she also felt discouraged, as if she was weak in some important part of the field. Assembling her own PC hadn’t been fun for her (I have no shame in admitting that I’ve never built a PC from scratch); fussing with hardware just doesn’t excite her like coding does right now.
I really love having a good IT team to support my work. And having great hardware at my disposal is critical to good work. But I have minimal interest in working on that part of the technology stack myself. Sure, I’ve done my time installing RAM chips onto mother boards, and re-seating PCI cards, but I never really wanted to care about the details of those components.
I always wants to create tools that solved interested problems.
What Problems are Interesting
We are all attracted to ideas and projects that sound exciting. This student became interested in the kind of work I do because I can talk about it with excitement and confidence. I enjoy the problems I get to solve on a day-to-day basis and that shows. I have no idea if she’d enjoy them. Being a Salesforce or web developer might bore her to tears.
A problem is not intrinsically interesting. We find problems interesting for our own reasons. That interest makes us intrinsically motivated to solve them.
I like writing middle-ware and creating related tools. Filling gaps left between other tools is interesting to me. I know people who love to create great UIs because it makes people love the product. Other friends love to work on security problems because it keeps systems secure (and gives them excuses to break into systems they should access). Some of my friends work on creating software to advance science. Still others love to create high performance solutions to handle big data problems. And others who help create games. I could go on, byt you get the picture.
My point is all the problems are interesting – to someone. None of the problems are interesting to all of us.
If you want to have or want a career creating software, look for jobs that solve problems you think are interesting. It doesn’t matter if I think your work is exciting. If you are excited about it, I’ll be excited to hear what you’re doing.
This week’s Salesforce Developer Podcast featured an interview I did with the host, Josh Birk, the end of last year. As much as I still don’t like the sound of my voice on recordings it was a fun interview and I am really excited to see it come out.
I recently had to disable a Salesforce Trigger from a client’s production environment. Having discovered the need last minute for a project, I needed to react quickly and make the change quickly. Since the official documentation is a bit lacking I decided it was time for blog post of better directions.
The Salesforce CLI directions in the article above make a few annoying assumptions:
That you’re happy to use MDAPI not SFDX.
That all your tests pass in production (which should be true, but let’s be real it;s always).
Connect VS Code to your target org. Easiest solution here is to just go to the command palate and authorize an org.
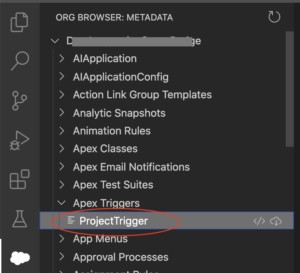
Pull down the trigger from your org. I find it easiest to go to the metadata browser, find the trigger under Apex Triggers and click the download icon on the right.
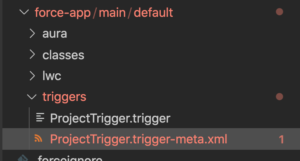
Update the trigger’s XML file to change the status. All project code files in SFDX are accompanied by an XML file of class metadata. Open the file and change the status to “Inactive”.
Navigate to the file in the file browser on the left in VS Code
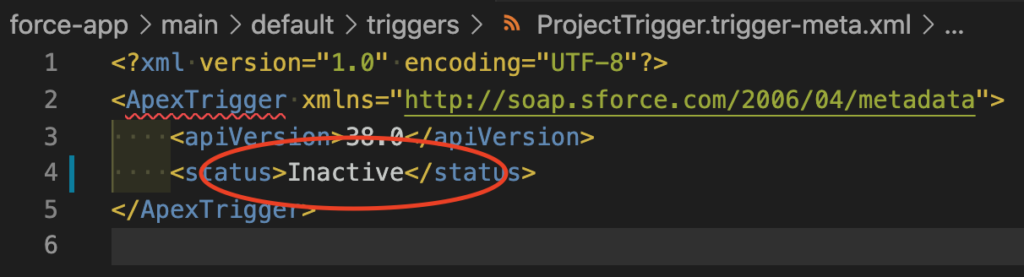
In the editor change the status from Active to Inactive, and save the file.
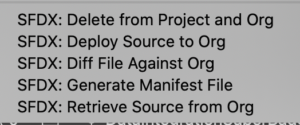
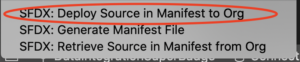
Generate a Manifest file for your trigger. Right click on the trigger code file in VS Code’s file explorer and select Generate Manifest, provide the file a useful name (in this case used DisableTrigger)
Depending on your setup the context menu might be quite long, SFDX additions are generally near the end of the list.
Deploy the change. If all your org’s tests currently pass you can just right click on the new manifest file and instruct VS Code to deploy the source in the manifest to the org.
What if tests fail on trigger deploy?
While all our tests should always pass all the time, Salesforce admins frequently find that’s not actually true in practice. Heck this trigger could be part of that problem in your org. But to deploy a code change we have to run some tests. Since we are disabling this trigger, the trigger code doesn’t need to be in tests we just need to run a working test with enough coverage to get the job done. So go find a test class and then we can deploy.
VS Code doesn’t currently have a setting to set the testing mode on a deployment, so you’ll need to do this last step in VS Code’s terminal (available by hitting control-` if you don’t have it open already). In the terminal run the following command (replacing [good_tests] with the name of your test class).
A few years ago I wrote a piece about project time estimation and created an estimating tool. My goal was to get project managers to listen to the fact that estimates were inherently a guess not promise. The tool I created took a series of project tasks, the estimated time range, and a level of estimator confidence. It then ran a Monte Carlo simulation with those tasks, and generated a histogram of possible outcomes.
Five years later I still use it for project estimates. But I have grown tired of its interface weaknesses and needed to add cost estimation to keep it useful. So I recently heavily revised the tool and posted an updated version (the old version is still available here).
The interface is still very utilitarian (pull requests welcome), but this version makes it make easier to adjust the tasks. Much more importantly it now also estimates costs, not just time.
The new version is faster than the previous. And it adjusts the graph type based on the range of possible outcomes.
Each task now includes inputs for min and max time, confidence, and hourly cost of that task. So if different people at different bill rates are part of the project it can still give you useful numbers.
The histograms broke down when faced with too many bars. So I settled on an XY scatter approach to help visualize the broader range that the cost estimator made normal.
Please give it a try, I’m always open to feedback, suggestions, and pull requests.
Costs Estimates
For this version I added the ability to include a unit cost for each task. The first tool worked just fine when you were estimating the tasks for one person who had one billing rate (or where hourly costs aren’t important). In practice teams need to be to able to do an estimate across all work streams, and different roles will have different billing rates.
This version includes a rate for each task and a graph of projected project costs.
Why I Created A Project Estimator
I wrote the original when I was struggling with project managers who would take any estimate you gave them as a range, pick a number, and promise the client (and themselves) we would hit it. To them an estimate was a promise – one that had to be kept. That lead me to badly overestimate projects so that the lowest end of my range would be a safe number – but that’s just a different form of bad estimation.
This graph from the original version helped convince PMs that estimates weren’t promises.
I had a good amount of experience providing estimates, and had read a lot on the topic. I knew there were teams that did better and I wanted to help our team improve.
The original tool was loosely inspired by one Joel Spolsky described ten years earlier. He has several important ideas on his process regardless of your project methodology. But his idea of using Monte Carlo simulations had stuck with me since that article had been new. After failing to find a tool that included it, I wrote my own.
Are the Project Estimates Any Good?
Fundamentally the simulations are only as good as the estimates provided. For any project I have been able to compare my simulated project estimates to final hours my work fell within one standard deviation of the median.
The confidence measure helps more than I expected. Originally, I added the measure of confidence because I needed something to determine how often the simulator should assume people are just plain wrong – and by how much. While I could have hard coded a solution I did not know how to pick good values. I knew that my confidence varies by the task. I also knew the less confident I am the more I am likely to be wildly off. So decide to make confidence an estimator provided variable, and use that to pick the size of overruns.
For every 10% you reduce the confidence, the simulation will allow the upper bound of the estimate to increase by the size or the entered upper bound. On a task you estimate at 7-10 hours, a 90% confident estimate will allow overruns up to 20 hours (just in the 10% of times that aren’t in the 7-10 range), and 30 hours for an 80% estimate.
That extra box also immediately helped me feel comfortable with my estimates. Knowing that the simulator would offset optimism bias for me I could stop trying to do that myself. My estimates can use tighter ranges trusting the software to offset expected bias.
A Value of the Graphs in Project Estimates
The graph has turned out to be the most important feature. Initially I included it because I wanted to play with D3 and have something more impressive than numbers to show. What I discovered was a reminder of the importance of data visualizations – even simple ones.
As I said before I created this tool when working with project managers who simplified all estimate ranges to a single number and held everyone to that number. The first time I presented numbers from the simulator those project managers picked the median and complained I made it too hard. The median was better than what we had before, but not enough to treat as a promise.
When I started presenting the graph those same people immediately started to change how they talked about the project. By visualizing the impact of uncertainty over several tasks they could see that the project might run far over my estimate – or far under. The more uncertainty, the longer the tail on the graph.
Suddenly they were comfortable talking about risks from overruns, finding ways to help clients understand the possible risks, and being understanding when a task proved harder than expected.
The graphs tell the story, and empowers the team to have an honest and productive about project estimates.