Salesforce Developer Podcast Episode 119

This week’s Salesforce Developer Podcast featured an interview I did with the host, Josh Birk, the end of last year. As much as I still don’t like the sound of my voice on recordings it was a fun interview and I am really excited to see it come out.

We talk about Snowfakery, Salesforce Open Source Commons, the evolution of PHP, Drupal, my career in general, and even a bit about spinning. I’d love to hear what you think.

Supportive Open Source Projects

Data Generation Toolkit Logo features Loinheart Astro with bits falling on him above the project label.

For a little over two years I’ve had the privilege of helping lead the Data Generation Toolkit Project for Salesforce. In general, Open Source projects are not known for their inclusive and supportive communities. I believe it is fair to say our project demonstrates that building a supportive community can yield great results.

Started by a question I wrote on a piece of paper in 2019 and posted to a wall, the project grows more every time I look around. That first meeting inspired the creation of Snowfakery and the recent training for Snowfakery has attracted more than 300 registrants. Contributors created documentation and presentations to help Salesforce admins learn to seed sandboxes. We are building a recipe library to help people starting out on Snowfakery. We launched two faker data providers. This year we reviewing and documenting other tools to generate and move Salesforce data.

More importantly we’ve built a project that is useful to the community, and supports new contributors to open source projects.

We did not get here accidentally. The project leadership wants to support the community members as much as create new tools. From the beginning we chose to encourage people unfamiliar with open source projects, contributions, and technologies.

Leading an Supportive Open Source Project

To be a supportive project starts with the leaders.

The project currently has seven identified leaders: Alisa Edwards, Allison Letts, Jung Mun, Paul Prescod, Samantha Shain, Cassie Supilowski, and myself. For those who like diversity statistics: that can be seen as 5 women, 2 men, 3 countries of residence, 3 counties of origin (not the same 3), 3 developers, 4 Salesforce admins, and at least 3 racial identities. No sub-group perfectly reflects its community, but that’s not a bad start in my opinion.

We have agreed that some of us lead specific sub-projects, while others tend to the health of the community. Everyone has a role.

When we started out with just 4 leaders either Paul (as creator and maintainer of Snowfakery) or I (as the person who started the project) could have dominated the project claiming founder status. Certainly men leading other open source projects have used that status to control the project direction. But Salesforce Open Source Commons projects are designed to discourage that behavior, and Paul and I embraced that design. Cori O’Brien created a wonderful space for our project to grow within.

Any open source project should focus on supporting its users. Our goal as a project is to support the Salesforce community – particularly nonprofit and education users. To do that we need the insights that only come from being open to outside ideas.

Our project’s leadership also established a pattern of self-review and reflection. Each year we will gather to discuss if the leadership group is the right size, and if anyone needs to step down. That creates a space for us to routinely reflect on what we’re doing and if we’re doing it well. The invitation to leave frees people from responsibilities they have to the project without frustration or burn out.

Recipes for Open Source Projects

Beyond our leadership team structure we also are intentional about how we encourage all contributors.

The project as a whole has space for all kinds of contributions. If someone wants to write documentation we will support them. When someone wants to learn to write recipes, we will work in pairs to get through the first one. People who want to write Python code for our faker providers get the chance to do that too.

We try to be kind to all contributors. We thank everyone when they open pull-requests or issues. Even I get thanked when I open a PR. Even if someone needs to make significant changes to a contribution before we commit it, we make sure to praise their effort.

These aren’t shit sandwiches. We genuinely appreciate all contributions and divorce that from any corrections that we request. As a long time open source contributor I am surprised at how much I appreciate the messages.

Maintaining Supportive Discussion Channels

Most open source maintainers know we have to maintain good ways for contributors to ask questions. Over time projects have used a wide variety of tools: IRC, News Groups, Email, issue trackers, and now Slack. In most projects those are the spaces that tend to become ugly. You see RTFM-style answers, personal criticisms, identity-based attacks, and other ugliness. The Slack channels for our project are a key piece of how we engage with each other, and support new contributors. We work hard to make sure people get timely answers, clear directions, and steady encouragement.

Our work falls within a community where our reputations matter and so there is a level of decorum absent in some open source projects. But no group is perfect and we will address issues when they arise. The open source common’s DEI Framework project will hopefully help us continue to deepen our understanding of the community. The kinds of attacks open source community spaces frequently allow in the name of good code, are simply unacceptable.

Come Join Us

The next community sprint for our project is coming up May 4th & 5th.

Disable a Salesforce Trigger in Production with VS Code

I recently had to disable a Salesforce Trigger from a client’s production environment. Having discovered the need last minute for a project, I needed to react quickly and make the change quickly. Since the official documentation is a bit lacking I decided it was time for blog post of better directions.

The Salesforce CLI directions in the article above make a few annoying assumptions:

  1. That you’re happy to use MDAPI not SFDX.
  2. That all your tests pass in production (which should be true, but let’s be real it;s always).
  3. You enjoy working out CLI commands in a rush.

What you need

Disabling a Trigger Using SFDX in VS Code.

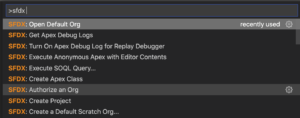
Connect VS Code to your target org. Easiest solution here is to just go to the command palate and authorize an org.

VS Code command pallet wit with SFDX commands shown.

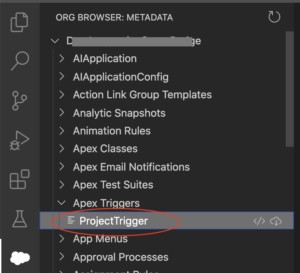
Pull down the trigger from your org. I find it easiest to go to the metadata browser, find the trigger under Apex Triggers and click the download icon on the right.

Screenshot of VS Code org browser showing an Apex Trigger to download.

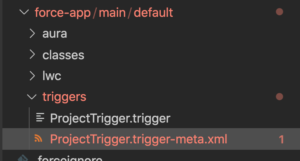
Update the trigger’s XML file to change the status. All project code files in SFDX are accompanied by an XML file of class metadata. Open the file and change the status to “Inactive”.

Screenshot of the VS Code file browser with the trigger's metadata file highlighted.
Navigate to the file in the file browser on the left in VS Code
Screenshot of code snippet emphasizing the Status XML tag and Inactive value.
In the editor change the status from Active to Inactive, and save the file.

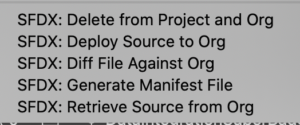
Generate a Manifest file for your trigger. Right click on the trigger code file in VS Code’s file explorer and select Generate Manifest, provide the file a useful name (in this case used DisableTrigger)

A segment of the contextual menu to show Generate Manifest command's location.
Depending on your setup the context menu might be quite long, SFDX additions are generally near the end of the list.

Deploy the change. If all your org’s tests currently pass you can just right click on the new manifest file and instruct VS Code to deploy the source in the manifest to the org.

Another contextual menu snippet, now with Deploy Source In Manifest circled.

What if tests fail on trigger deploy?

While all our tests should always pass all the time, Salesforce admins frequently find that’s not actually true in practice. Heck this trigger could be part of that problem in your org. But to deploy a code change we have to run some tests. Since we are disabling this trigger, the trigger code doesn’t need to be in tests we just need to run a working test with enough coverage to get the job done. So go find a test class and then we can deploy.

VS Code doesn’t currently have a setting to set the testing mode on a deployment, so you’ll need to do this last step in VS Code’s terminal (available by hitting control-` if you don’t have it open already). In the terminal run the following command (replacing [good_tests] with the name of your test class).

sfdx force:source:deploy -x manifest/DisableTrigger.xml -l RunSpecifiedTests -r [good_tests]

It should deploy pretty quickly, but you can check the status by going to settings in your org and checking the Deployment Status.

Announcing Two New Snowfakery Faker Providers

For the last two years I’ve been fortunate to serve as a leader of the Salesforce Open Source Commons Data Generation Toolkit project. That project has produced and inspired a variety of efforts, including Snowfakery and a collection of starter recipes.

This week, along with my colleague Allison Letts, Salesforce’s Paul Prescod (the creator of Snowfakery), and our fellow project contributor Jung Mun, I helped create two new faker providers for Snowfakery:

What These Faker Providers do

The use of Snowfakery is growing. The more we use it, the more we want the data tailored to specific projects. And the more we find places where the Faker project’s providers do not have quite what we want. In particular the project does not (well did not) have providers for nonprofits and education specific data.

The Nonprofit provider currently just provides organization names:

$ snowfakery snowfakery_nonprofit_example.recipe.yml --target-count 10 nonprofit
nonprofit(id=1, nonprofit_name=Eastern Animal Asscociation)
nonprofit(id=2, nonprofit_name=1st Animal Foundation)
nonprofit(id=3, nonprofit_name=Upper Peace Alliance)
nonprofit(id=4, nonprofit_name=Southern Peace Home)
nonprofit(id=5, nonprofit_name=Unity Home)
nonprofit(id=6, nonprofit_name=Western Peace Home)
nonprofit(id=7, nonprofit_name=Upper History Foundation)
nonprofit(id=8, nonprofit_name=Upper Friends Committee)
nonprofit(id=9, nonprofit_name=Eastern Pets Center)
nonprofit(id=10, nonprofit_name=Northern Animal Foundation)

For the Education provider we have a bit more. You can generate college names, departments, and faculty titles.

$ snowfakery snowfakery_edu_example.recipe.yml
Account(id=1, Name=South Carolina University)
Contact(id=1, FirstName=Roberto, LastName=Stanton, Title=Associate Professor of Microbiology & Immunology)
Account(id=2, Name=French)

The providers can of course run as a standard faker community provider. Once you are setup with Faker just add the new providers with pip:

pip install faker-edu faker-nonprofit

Then you can use the libraries in your code:

1
2
3
4
5
6
7
8
from faker import Faker
import faker_edu
 
fake = Faker()
fake.add_provider(faker_edu.Provider)
 
for _ in range(10):
    print(fake.institution_name())
1
2
3
4
5
6
7
8
from faker import Faker
import faker_nonprofit
 
fake = Faker()
fake.add_provider(faker_nonprofit.Provider)
 
for _ in range(10):
    print(fake.nonprofit_name())

How we got here

A few months ago I posted on how to extend Faker to create nonprofit organization names. Allison took that as a starting point to create a similar project to generate names of colleges, departments, and academic titles (and a greatly improved phone number generator but that’s not included since it’s more general). Both of these projects were good proof-of-concept but were rough around the edges. So this week, with Paul’s guidance and Jung’s input, we contributed the more polished versions to the community.

During a virtual working session on Wednesday we restructured the projects, cleaned up code, added sample recipes for Snowfakery, and published them to PyPi. By publishing these as Faker providers on PyPi, and not as Snowfakery plugins, they are available to a wider audience. By having them owned by a larger open source community we are expecting them to enjoy long-term support.

Both are still just getting started. For example the nonprofit one still just generates organization names, but would benefit from job titles, program names, and more. The EDU provider right now just handles colleges, but is expected to generate other education related data in the future. We also have a plan for a third provider to help improve the diversity of the names generated by Faker to make our fake data more representative of real communities.

The Data Generation Toolkit project has been a great example of what happens when you bring people from a wide variety of backgrounds together to solve technical problems. Like the larger Data Generation Toolkit team Paul, Allison, Jung, and I all have different backgrounds, skills, and experiences. By coming together we are able to help each other find better solutions than any one of us would have found on our own.

It’s been an exciting week, and I’m looking forward to more to come.

SC DUG July 2021 – Queries on Queries

For the July 2021 SC DUG, I gave my new talk titled “Queries on Queries” which poses questions to ask yourself when migrating data between systems. Data migrations are often critical to project success, but all too often that are treating as a throw-away process. This talk is intentionally platform agnostic building from my experience with both Drupal and Salesforce.

If you would like to join us please check out our up coming events on MeetUp. You’ll find our meeting times and, once you RSVP, remote connection information.

We frequently use these presentations to practice new presentations, heavily revised versions, and test out new ideas with a friendly audience. So if some of the content of these videos seems a bit rough please understand that is some of the point. If you want to see a polished version checkout our group members’ talks at camps and cons.

If you are interested in giving a practice talk, leave me a comment here, contact me through Drupal.org, or find me on Drupal Slack. We’re excited to hear new voices and ideas. We want to support the community, and that means you.

Snowfakery Custom Plugins Part 2

Last week I posted part 1 of this series on creating plugins for Snowfakery. This second installment covers creating custom Faker Providers to use as plugins for Snowfakery.

Why create a Faker Provider instead of Snowfakery Plugin

Python’s Faker library provides many useful things, but not everything you might want. Fortunately it is designed to be extended, and Snowfakery is designed to help make it possible for those extensions to be project specific when you need to (or when it makes it easier for your team to share recipes).

Sometimes you need to have all the features of a Snowfakery plugin, like maintaining state. But often you just need to kill a gap left by the Faker community offerings. In that case, a Faker Provider may offer longer term benefits like re-usability in other projects, and useful helper functions, that give it the strong choice.

Things you’ll need

You do not need to have reviewed everything in Part 1, but you will want to look at the project structure section and to make sure you have the following tools:

  1. Python 3 (any recent-ish version should be fine), and the experience to read and write simple Python scripts (they aren’t any harder to follow than YML just different).
  2. Snowfakery 1.12 or later. Note: if you have CCI installed it contains Snowfakery but on Windows you may need extra setup.
  3. The Faker module for Python (probably via: pip3 install Faker). Not strictly required but can help you with testing.
  4. A code editor you like that supports both Python and YML (which is pretty much anything good).
  5. You probably want experience working on at least one or two Snowfakery recipes.

Reminder about project structures

In part 1 we build a project around the built-in search patterns of Snowfakery.

Snowfakery looks for plugins in a select number of places:

  • The Python path.
  • In a plugins directory in the same directory as the recipe.
  • In a plugins directory below the current working directory.
  • A sub-directory of the user’s home directory called .snowfakery/plugins.
Recipe directory layout

For this example the plugins directory will live within the folder with our recipe (called recipes), but you can move the plugins directory up a level and it will work just as well.

To get started, in your project create a recipes directory. Next create a plugins directory within recipes. Then create faker_nonprofit directory in plugins. You can ignore the snowHelper and snow_product.yml examples from part 1 in the screenshot on the right, but that’s generally what we’re doing.

Create your first Snowfakery Faker Provider

Faker itself does not have a community supported generator of Nonprofit organization names, and when you work with nonprofits a lot sometimes you need those. That is exactly what we’ll create in just a minute.

In the plugins directory you created in part 1, create a directory for your new provider with the pattern faker_[my_service_name], in my case faker_nonprofit. Then in that new directory create a file named __init__.py this defines the Faker provider Python module.

You can see the full working example here but I’ll walk through the outline.

The file opens by providing a doc string and importing the faker.providers module.

1
2
"""Provider for Faker which adds fake nonprofit names, and program names."""
import faker.providers

The next several lines of the faker_nonprofit module provide arrays of words to use in the generation of fake names. Depending on what your provider does this may or may not be useful to you (but it’s very common).

Then we define the Provider itself as a class that extends the BaseProviders class, with whatever methods you want to call:

1
2
3
4
5
6
7
8
9
class Provider(faker.providers.BaseProvider):
   """Provider for Faker which adds fake nonprofit information."""
  
   def nonprofit_name(self):
       """Fake nonprofit names."""
       prefix = self.random_element(PREFIXES)
       suffix = self.random_element(SUFFIXES)
       topic = self.random_element(TOPICS)
       return " ".join([prefix, topic, suffix]).strip()

Those random element selections are from the arrays of words I mentioned a minute ago. Basically we’re just building a name from some selected words.

A note about tests

Unlike Snowfakery plugins, Faker projects have existing patterns for how to setup tests (they are not totally consistent but there are patterns out there). So the complete code on Github includes a testing module as well, and you should consider something similar for yours (particularly if you are considering making it available to the wider community). It’ll allow you to test your provider generically not just when it’s running through Snowfakery.

Linking your Provider to a Snowfakery Recipe

Now that we have a local Faker Provider, we need to connect it to our recipe.

A very simple recipe (in our recipe directory) should demonstrate the output quite nicely:

1
2
3
4
5
6
- plugin: faker_nonprofit.Provider
 
- object: Account
  fields:
    Name:
      fake: nonprofit_name

Run the recipe through Snowfakery and you can see the name appears believable:

1
2
$ snowfakery recipes/sample_recipe.yml
Account(id=1, Name=Southern Unity Community)

The project uses a slightly larger recipe here that uses both plugins and generates more than one object. The full recipe in the repo will create one Salesforce Account object that has a Fake Nonprofit name, a custom field for a Main Service that will be one of our snowy puns, an address, and two related contacts with all their basic information included.

1
2
3
4
$ snowfakery recipes/sample_recipe.yml
Account(id=1, Name=Upper Friends Committee, Main_Service__c=Snowmanage, BillingStreet=4773 Giles Plains Suite 878, BillingCity=South Daniel, BillingState=Virginia, BillingPostalCode=34516, BillingCountry=United States, ShippingStreet=7844 Hester Shore Apt. 299, ShippingCity=Maynardview, ShippingState=Indiana, ShippingPostalCode=86323, ShippingCountry=United States, Phone=956.673.3002x471, Fax=+1-786-744-2112x36239, RecordType=Organization)
Contact(id=1, AccountId=Account(1), Salutation=Misc., FirstName=Isaac, LastName=Barr, Email=joypeters@example.com, Phone=+1-808-508-0989x418, MobilePhone=(987)475-7200x8072, Title=Tour manager, Birthdate=1982-03-27)
Contact(id=2, AccountId=Account(1), Salutation=Mx., FirstName=Erica, LastName=Lopez, Email=angel01@example.org, Phone=(011)243-1677x868, MobilePhone=(079)466-5474x52399, Title=Research officer, political party, Birthdate=2000-07-07)

If you have interest in seeing the Nonprofit Provider made into a more complete tool and released as its own project please let me know.

Snowfakery Custom Plugins Part 1

Last November I wrote a bit about creating Salesforce data with Snowfakery.  I’ve continued to use the tool for work, provide feedback to the project maintainer, and help the Salesforce Open Source Commons Data Generation Toolkit Project as we started to build a library of sample recipes. Hopefully I will have more to say on that after the next Community Sprint.

Snowfakery not only gives you a way create carefully shaped relational data sets of nearly any size, it also allows you to create plugins to extend its abilities. those plugins come in two flavors: Snowfakery Plugins, and Faker Providers.

For more technical details you may want to read the project has documentation. My intention here is to provide an end-to-end example of how to make them work.

This article started out as one long piece but to keep it focused I’ve decided to break it into two parts:

  • Part 1 covers Snowfakery Plugins.
  • Part 2 covers creating custom Faker Providers for Snowfakery projects.

The code for both parts is on Github if you want to see the project as a whole.  

Things you’ll need

  1. Python 3 (any recent-ish version should be fine), and the experience to read and write simple Python scripts (they aren’t any harder to follow than YML just different).
  2. Snowfakery 1.12 or later. Note: if you have CCI installed it contains Snowfakery but on Windows you may need extra setup.
  3. A code editor you like that supports both Python and YML (which is pretty much anything good).
  4. You probably want experience working on at least one or two Snowfakery recipes.

Snowfakery Plugin Project Structure

This setup just talks about Snowfakery recipes on their own, not within a larger project, but the concepts are the same even if the details are different.

Snowfakery looks for plugins in a select number of places:

  • The Python path.
  • In a plugins directory in the same directory as the recipe.
  • In a plugins directory below the current working directory.
  • A sub-directory of the user’s home directory called .snowfakery/plugins.
Recipe directory layout

For this example the plugins directory will live within the folder with our recipe (called recipes), but you can move the plugins directory up a level and it will work just as well.

To get started, in your project create a recipes directory. Next create a plugins directory within recipes. Until part 2 you can ignore the faker_nonprofit directory in the screenshot on the right, but that’s generally what we’re doing.

Create Your First Snowfakery Plugin

In the Snowfakery community we use a lot of snow-based puns to name things. So to help create fake sounding products for our projects we might need a simple plugin to generate us new words that match our general naming convention.

In the plugins directory create a new file called snowHelper.py. And copy the follow Python code into your editor:

from snowfakery import SnowfakeryPlugin
  
class SnowPunnary(SnowfakeryPlugin):
   class Functions:
       def snowpunner(self, word):
           return 'Snow' + word

The code here is pretty straight forward if a little nested. We are loading the SnowfakeryPlugin class from Snowfakery itself, and then extending that class to create our plugin. Snowfakery assumes that the plugin has a subclass to hold your plugin functions (called Functions) and that you add your functions to that subclass. Your functions can have a parameter (here the word being punned on) to accept inputs from other parts of the recipe.

Our SnowProduct Recipe

Now we need a recipe that will actually use our plugin. In the recipes directory create a file called snow_product.yml and copy in the following YAML code:

- plugin: snowHelper.SnowPunnary
  
- object: Product
  count: 10
  fields:
    Name:
      SnowPunnary.snowpunner: ${{fake.word}}

In the first line we load our plugin using Python’s module naming convention – because it is getting loaded as a Python module. The pattern here is the file name (without file extension) then the class name. In the last line we then call the plugin’s function by referencing the class name and the function name.

You can run the file directly in Snowfakery and see the outputs:

$ snowfakery snow_product.yml
Product(id=1, Name=Snowplantary)
Product(id=2, Name=Snowbadary)
Product(id=3, Name=Snowmillionary)
Product(id=4, Name=Snoweffortary)
Product(id=5, Name=Snowgreenary)
Product(id=6, Name=Snowbehaviorary)
Product(id=7, Name=Snowcouldary)
Product(id=8, Name=Snowforceary)
Product(id=9, Name=Snowyesary)
Product(id=10, Name=Snowcompanyary)

I’m going to show, but not go into great depth on, one more detail: plugins can save state. Snowfakery provides a mechanism for tracking context variables between calls that allow you to track current state. So we can have ours count the number of times the snowpunner function has been called and return that count in another function:

from snowfakery import SnowfakeryPlugin
  
class SnowPunnary(SnowfakeryPlugin):
   class Functions:
       def snowpunner(self, word):
           context_vars = self.context.context_vars()
           context_vars.setdefault("count", 0)
           context_vars["count"] += 1
           return 'Snow' + word
  
       def currentCounter(self):
           context_vars = self.context.context_vars()
           return context_vars["count"]

Then update the recipe like this:

- object: Product
  count: 10
  fields:
    Name:
      SnowPunnary.snowpunner: ${{fake.word}}
    Index:
      ${{SnowPunnary.currentCounter()}}

Notice that to call the function without a parameter we use the formula syntax.  Run it again and we see the new index that shows the count:

$ snowfakery snow_product.yml
Product(id=1, Name=1: Snowimpact, Index=1)
Product(id=2, Name=2: Snowfund, Index=2)
Product(id=3, Name=3: Snowdark, Index=3)
Product(id=4, Name=4: Snowteach, Index=4)
Product(id=5, Name=5: Snowteam, Index=5)
Product(id=6, Name=6: Snowsummer, Index=6)
Product(id=7, Name=7: Snownew, Index=7)
Product(id=8, Name=8: Snowperform, Index=8)
Product(id=9, Name=9: Snowonto, Index=9)
Product(id=10, Name=10: Snowmodel, Index=10)

It is important to remember that while it would be possible to add a value to the context variable on each iteration, that would cause Snowfakery to consume more memory on each iteration. Snowfakery is designed to generate records by the hundreds of millions if asked, and does so while consuming very little extra memory – you can do things in context variables that would break down on larger runs.

In part 2, I talk about creating a custom Faker Provider and loading it into a Snowfakery recipe.

Why and How to Write Good How-To Articles

Part of contributing to any open source project, or even really being a contributing member of any community, is sharing what you know. That can come in many forms. While many projects over emphasis code, and most of us understand the value of conference talks, good how-to articles are some of the most critical contributions for any software platform. There isn’t much point to a tool if people cannot figure out how to use it.

Why do I write how-to articles

I’ve contributed code to Drupal, some of it even good and useful to others. But usually when I hear someone noticed something I created it’s blog posts about how to solve a problem.

When I struggled to find the answer to a question I expect it is a candidate for a how-to post. I am not so creative that I am often solving a problem no one has, or will want to, solve for another project. And I am good enough at what I do to know that if I struggled to find an answer it was probably harder to find than it could been.

That helps me find topics for articles that are helpful to the community and benefit me.

How-to articles help others in the community use tools better

The goal of a good tutorial is to help accelerate another person’s learning process. The solution does not have to be perfect, and I know most people will have to adapt the answer to their project. I write them when I struggled to find a complete answer in one place, and so I’m hoping to provide one place that gives the reader enough to succeed.

Usually I combine practical experience earned after digging through several references at various levels of technical detail – including things like other people’s blog posts, API documentation, and even slogging through other people’s code. I then write one, hopefully coherent, reference to save others that digging extra reading.

The less time people spend researching how to do something, the more time they have to do interesting work. Better yet, it can mean more time using the tools for their actual purpose.

How-to articles serve as documentation for me, colleagues, and even clients

The best articles serve as high level documentation I can refer back to later to help me repeat a solution instead of recreating it from scratch. When I first wrote how-to articles I was solidifying my own learning, and leaving a trail for later.

They also came to serve as documentation for colleagues. When I don’t have time to sit with them to talk through a solution, or know the person prefers reading, I can provide the link to get them off and running. Colleagues have given me feedback about clarity, typos, and errors to help me improve the writing.

I have even sent posts to clients to help explain how some part of their solution was, or will be, implemented. That additional documentation of their project can help them extend and maintain their own projects.

How-To articles give me practice explaining things

One of the reasons I started blogging in the first place was to keep my writing skills sharpened. How-to articles in-particular tend to be good at helping me refine my process in specific areas. The mere act of writing them gives me practice at explaining technology and that practice pays off in trainings and future articles. If you compare my work on Drupal, Salesforce, and Electron you can see the clarity improve with experience.

How-To articles give me work samples to share

When I’ve been in job applicant mode those articles give me material to share with prospective employers. In addition to Github and Drupal.org, the how-to articles can help a hiring manager understand how I work. They show how explain things to others, how I engage in the community, and serve as samples of my writing.

How-To articles help me control my public reputation

I maintain a blog, in part, to help make sure that I have control over my public reputation. To do that I need inbound links the help maintain page rank and other similar basic SEO games.

From traffic statistics I know the most popular pages on this site are technical how-to articles. From personal anecdotes I know a few of my articles have become canonical descriptions of how to solve the problems.

When I first started my current job we had a client ask if I could implement a specific feature that he’d read about in a post on Planet Drupal. It turned out to be mine. Not only was I happy to agree to his request, it helped him trust our advice. My new colleagues better understood what this Drupal guy brought to the Salesforce team. Besides let’s be honest it’s fun when people cite your own work back at you.

Writing your own

You don’t have to maintain a whole blog to write useful how-to articles. Drupal, like most large open source projects, maintains public wiki-style documentation. Github pages allow anyone to freely publish simple articles and there are many examples of single-page articles out there. And of course there is no shortage of dedicated how-to sites that will also accept content.

The actual writing process isn’t that hard, but often people leave out steps, so I’ll share my process. This is similar to my general advice for writing instructions.

Pick your audience

It’ll be used more widely than whoever you think of, but have an audience in mind. Use that to help target a skill set. I often like to think of myself before I started whatever project inspired the article. The higher your skill set the more you should adjust down, but it’s hard to adjust too far, so be careful is aiming for people with far less experience than you have – make sure you have a reviewer with less experience check your work. Me − 1 is fine, Me − 5 is really hard to do well.

Start from the beginning and go carefully step by step

Start with no code, no setup, nothing. Then walk forward through the project one step at a time writing out each step. If you gloss over a detail because you assume your audience knows about it add reference links. You can have a copy of a reference project open but do not use it directly; it’s there to prevent you from having to re-research everything.

List your assumptions as you go

Anything that you need to have in place but don’t want to describe (like installing Drupal into a local environment, creating a basic module, installing Node, etc) state as an explicit assumption so your reader starts in the same place as you do. Provide links for any assumptions which are likely hard for your expected audience to complete. This is your first check point – if there are no good references to share, start from where that article you cannot find should start (or consider writing that article too). 

Provide detailed examples

Insert code samples, screenshots, or short videos as you progress. Depending on what you are doing in your article the exact details of what works best will vary. Copy and paste as little reference code as possible. This helps you avoid accidentally copying details that may be revealing of a specific project’s details.

If you look at mine you’ll see a lot of places where I include comments in sample code that say things like “Do useful stuff”. That is usually a hint that whoever inspired the article had interesting, and perhaps proprietary, ideas in that section of code (or at least I worried they would think it was interesting). I also try to add quick little asides in the code samples to help people pay attention.

Test as you go

Make sure your directions work without that reference project you’re not sharing. This is both so your directions work properly and further insulation against accidentally sharing information you ought not share.

End with a full example

If you end up with a bunch of code that you’ve introduced piecemeal, provide a complete project repo or gist at the end. You’ll see some of my articles end in all the code being displayed from a gist, and others link to a full repository. Far too many people simply copy and paste code from samples and then either use it blindly or get stuck. Moving it to the end helps get people to at least scan the actual directions along the way.

Give credit where credit is due

If you found partial answers in several places during your initial work, thank those people with links to their articles. Everyone who publishes online likes a little link-love and if the article was helpful to you it may be helpful to others. Give them a slight boost.

Salesforce Lightning Web Components with URL Parameters

A couple weeks ago I needed to create a Salesforce Lightning Web Component (LWC) that pulls values from URL parameters. While the process is very simple it turns out the vast majority of examples on the web are out of date due to a security update Salesforce made sometime last year – and so I spent a frustrating afternoon throwing ideas at the wall until a colleague stumbled into a comment on a blog post that was an incorrect example by a highly trusted expert noting the needed fix.  So, in the hopes of shortening the search for anyone else trying to get this to work, I’m offering an example that works – at least as of this writing.

To be fair the official docs are correct but it is easy to look passed an important detail: if you do not put a namespace on your value the parameter will be deleted.

That change was the security update, before that you could have any value as your parameter name now you have to have __ (two underscores) in the name.  Officially the docs say that in the left side of those underscores you should have the namespace of your package or a “c” for unpackaged code. As far as I can tell at least in sandboxes and trailhead orgs you can have anything you want as long as there are characters before and after the __ (which kinda makes sense since package developers need to be able to write and test their JavaScript before they build their package).

So your final URLs will look something like:
https://orgname.my.salesforce.com/lightning/r/Contact/0034x000009Xy5gAAC/view?c__myUrlParameter=12345

Basic LWC

Now with that main tip out of the way on to a full example.

My assumption going into this is that you know how to create a very basic Hello World quality LWC. If not, start with the Trailhead Hello World example project.

1) Create a new component to work with, mine will be very simple to help keep the details clean, but you can fold this into more interesting code bases.

2) Update the component’s meta.xml file to set isExposed to true, and at least a target of lighning__RecordPage (although any target will do if you know how to use it), and configure the target to connect to Contact (although again any settings you know how to use are fine here).

<?xml version="1.0" encoding="UTF-8" ?>
<LightningComponentBundle xmlns="http://soap.sforce.com/2006/04/metadata">
   <apiVersion>50.0</apiVersion>
   <isExposed>true</isExposed>
   <description>Example Lightning Web Componant to read URL parameters.</description>
   <targets>
       <target>lightning__RecordPage</target>
   </targets>
   <targetConfigs>
       <targetConfig targets="lightning__RecordPage">
           <objects>
               <!-- This is setup to run on contact but you could use any sObject-->
               <object>Contact</object>
           </objects>
       </targetConfig>
   </targetConfigs>
</LightningComponentBundle>

3) In your JS file beyond the main LighningElement you need to add imports for wire, track, and CurrentPageReference from the navigation library:

import { LightningElement, wire, track } from "lwc";
import { CurrentPageReference } from "lightning/navigation";

4) Add a tracked value you want to display inside the main class: 

export default class Parameter_reader extends LightningElement {
  @track displayValue;

5) Next use the wire decorator to connect CurrentPageReference’s getStateParameters to your own code to get an use the URL parameters:

@wire(CurrentPageReference)
getStateParameters(currentPageReference) {
 if (currentPageReference) {
   const urlValue = currentPageReference.state.c__myUrlParameter;
   if (urlValue) {
     this.displayValue = `URL Value was: ${urlValue}`;
   } else {
     this.displayValue = `URL Value was not set`;
   }
 }

From the code sample above you can see that we’re getting the values from currentPageReferences’s state child object, and then attaching them to our tracked value we created in step four.

6) Update the HTML file to display your value ideally leveraging the SLDS along the way:

<template>
 <div>
   <lightning-card title="Url Sample" icon-name="custom:custom14">
     <div class="slds-m-around_medium">
       <p>{displayValue}</p>
     </div>
   </lightning-card>
 </div>
</template>

7) Deploy all this code to your org.

8) Go to a contact record, and edit the page. Add your new competent to the side bar. Save and activate the page.

9) Return to the record page, the component should appear and say “URL Value was not set”.

10) In the address bar add to the end of the url: ?c__myUrlParameter=Hello, and reload the page, the component should now read “URL Value was Hello”.

A screenshot of the sample component displaying the provided text of "hello".

What about sending the value to APEX?

Now, let’s go one step further and send this parameter over the APEX and post a response.

1) Create an APEX class, and create a public static method using the AuraEnabled decorator.

@AuraEnabled(cacheable=true)
public static String reflectValue(String value) {
    // Really you should do something useful here.
    return value;
}

In this case we’re starting with a method that just passes back the same string it was handed, but obviously you can do whatever you want here.

BE CAREFUL ABOUT SECURITY!

If you take an ID as your parameter make sure you are thinking about what happens when someone sends an ID for an object they should not see, is for an object other than the type you expected, and other similar things. The platform can help you but security is your job here, take it seriously!

2) Create good tests for your class, and deploy the code.

3) Import the new function into your JS file:

import reflectValue from "@salesforce/apex/valueReflection.reflectValue";

Update the getStateParameter handler we wrote before to call this function as a JavaScript promise:

getStateParameters(currentPageReference) {
  if (currentPageReference) {
    const urlValue = currentPageReference.state.c__myUrlParameter;
    if (urlValue) {
      reflectValue({ value: urlValue })
        .then((result) => {
          this.displayValue = `URL Value was: ${result}`;
        })
        .catch((error) => {
          this.displayValue = `Error during processing: ${error}`;
        });
    } else {
      this.displayValue = `URL Value was not set`;
    }
  }
}

4) That’s it! Deploy your code and reload the page, and your values should pass through to APEX, come back and get displayed.

The complete SFDX project for this example is up on Github.

Salesforce Electron Starter

Back in August I created an Electron project starter that provides a template to use for electron projects with the goal of outlining how to follow the current best practices for writing secure electron apps. I had extracted that from a couple of personal projects I work on from time to time, one of those projects is ElectronForce – a tool to explore Salesforce orgs.  Because I get ideas of things I want to try out from time to time as Salesforce APIs applications I have now created a derivative project that is setup to create apps that leverage JSForce to interact with Salesforce orgs.

Thus I would like to introduce Electron Salesforce Base

Like my generic project starter it is intended to be a jumping off point that handles some of the basic elements of a project.  It’s a bit more opinionated because comes with a little more plumbing in place – there is a simple interface and it’ll actually log into orgs (assuming you have your security token). 

The interface is built using a Bootstrap dark theme from Bootswatch, and is set up to follow the Airbnb ESLint standards (with a couple small tweaks). The interface generates two windows, one that is meant to be the main interface and includes the controls to log into your org, and a second that is meant to keep a running log of events.

The main thread is fully isolated from the render threads, with all requests and data being passed back and forth using the current inter process communication methodology from Electron leveraging the IPCmain object in the main thread and the contextBridge in the render thread – there is no access to remote in the render thread (actually remote is fully disabled as it should be), and the preload.js file largely serves to filter IPC requests to maintain thread isolation. Currently the main thread of this project isn’t what I would call graceful, and I’m actually working on a refactor for ElectronForce to improve the IPC listener definitions (readers with examples of good design patterns are more than welcome to offer suggestions, whatever I settle on will likely get folded back into this project eventually).

To help understand the general pattern that’s emerging as people get better at sandboxing in Electron (and Electron gets better at demanded it) I find it helpful to think of Electron apps in a client-server model with two largely separate applications and a well defined API for communication between them. You’ll see that reflected here, and in my other recent Electron apps. You can implement whatever you’d like in each layer and just pass messages back and forth. This also means you can totally refactor one part of your application without worrying about the other. So if you hate my proto-interface dump it and build something better.

If you look at the code for this base project, then look at ElectronForce, you will see the render thread provides all the details of the interface – including use of render-friendly libraries like jQuery and a collection of helper functions to make life a little easier – makes an API call (with a filter list provided in preload.js), and then handles responses from the main thread. In main.js you see all the IPC listeners defined, which then pass the needed data to JSForce to make the API calls, before handing back structured data for the interface to render.

As you dig through the code you may notice various @TODO statements that are notes to myself about places with obvious room for improvement. I’m always happy to get suggestions, as comments here, issues there, or as pull requests to help resolve those notes with better solutions.